Tami, yesterday you asked me how you can "fix" the letter B so that the whole negative is part of the cardstock that it was cut out of. This quick video tutorial will answer that question. :-)

Showing posts with label make-the-cut. Show all posts
Showing posts with label make-the-cut. Show all posts
Wednesday, March 16, 2011

Wednesday, March 2, 2011
Read Across America Day! Create a Book Blog Hop plus a special giveaway.

It's the NEA's Read Across America Day and it's also Dr. Seuss' Birthday today!

Thank you for joining us on the Create A Book Blog Hop hosted by Joy of joyslife.com!
The following is the list of blogs who are participating on this hop. Did you come here from Rosy's blog? If not, just click here to start the hop from Joy's blog
and keep hopping until you're back here. In case you get lost hopping, just come back here and
refer back to the list below to get back on track.
Joy - http://joyslife.com
Tammy - http://tammyjennings.blogspot.com
Rosy - http://sweetdelightspapernmore.blogspot.com
You're HERE--->Jin - http://www.underacherrytree.com
Melissa - http://melissa-moecreations.blogspot.com
Amanda - http://amandascraftsandmore.blogspot.com
Ruthie - http://www.septemberninth.blogspot.com
Martha - http://pattisscrapingtime.blogspot.com/
Scraps2Treasures - http://scraps2treasure.blogspot.com/
Suzanne - http://cricutcraftingrammy.blogspot.com/
Sandra - http://365daysofcricut.blogspot.com/
Becky - http://www.cricutinmyclassroom.blogspot.com/
Misty - http://www.abusyplace.blogspot.com/
Lisa - http://bitbythecricutbug.blogspot.com/
Tammy - http://tammyjennings.blogspot.com
Rosy - http://sweetdelightspapernmore.blogspot.com
You're HERE--->Jin - http://www.underacherrytree.com
Melissa - http://melissa-moecreations.blogspot.com
Amanda - http://amandascraftsandmore.blogspot.com
Ruthie - http://www.septemberninth.blogspot.com
Martha - http://pattisscrapingtime.blogspot.com/
Scraps2Treasures - http://scraps2treasure.blogspot.com/
Suzanne - http://cricutcraftingrammy.blogspot.com/
Sandra - http://365daysofcricut.blogspot.com/
Becky - http://www.cricutinmyclassroom.blogspot.com/
Misty - http://www.abusyplace.blogspot.com/
Lisa - http://bitbythecricutbug.blogspot.com/
***
This hop is really special to me because we love books in our house. My kids are avid readers and I love to use my Cricut to write stories for them. Here are a few stories that I have written for my daughters:



By the way, in case you are wondering, Pan-Dee is my youngest daughter's lovey. :-)
For today's hop, I made a special little tab-style board book. The entire project was created with Make-the-Cut, my Cricut Expression machine, the Canon PIXMA MP250 Inkjet Printer and SVGs, Graphics, Fonts, and Papers by Lettering Delights. I do not use nor own a Cricut Imagine.
This book was inspired by my three daughters who are 8 years old (twins) and 5 years old (Baby Sister). The main image on the front cover was cut out with Make-the-Cut using the Print-and-Cut technique. All the pages are made strong with cardboard from cereal and cracker boxes. The book was put together with Zutter's Bind-it-all.
Here is our book of words to remember; words that Hubby and I tell our children so very often...


I hope that you enjoyed my book. This is the list of Lettering Delights products that I used:
Because no blog hops should go without a giveaway, I have blog candy too. Since Read Across America was started to celebrate the joy of reading, today's giveaway is special and is something that you can win for the little one in your life. I am giving away ONE Dangerous and Daring Gift Set for Boys and Girls.


Here's how to win:
You must be a follower to enter in the giveaway. If you are not already a follower, just click on the "Follow" button on the right.
Leave ONE comment on this post
Make sure that you leave your email address or any other form of contact so that I may inform you if you win.
Due to the heavy weight of this item, this giveaway is only open to U.S. Residents with a U.S. Mailing Address.
Entries to the giveaway will be accepted from now until Wednesday Mar 9, 11:59pm PST. The winner will be chosen by RANDOM.ORG and announced on Thursday Mar 10, 2011.
***
If you're ready to continue on your hop, your next stop is Melissa's Moe Creations.
Happy Blog Hopping, and don't forget to Read a Book Today! ;-)
Wednesday, February 16, 2011
Lettering Delights' Sweet Nothings SVG Set

By now you might have seen Lettering Delights' Sweet Nothings SVG set. If you take a closer look at the cuts that are on it, you might wonder what the last three files are for.
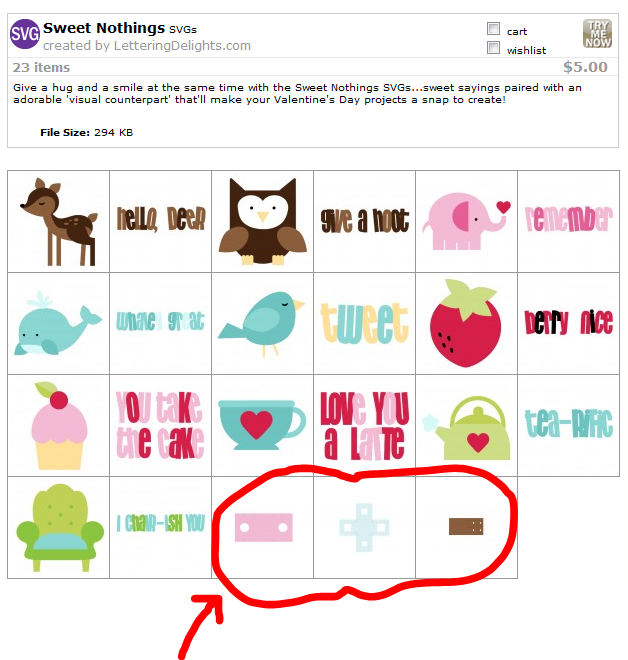
The three files are actually cut files for some really fun and very unique-looking cards. Let me show you how to use them.

File no. 21 opens like a bi-fold card with a circle cut-out in the center. I used Make-the-Cut to make this "Hello Deer" card. This card is so easy to make! Lettering Delights has already done the hard part by coming up with the unique design of this card. All that I had to do was to put a focal image and the greeting. By the way, the deer and the greeting are also from the Sweet Nothings SVG set.


File no. 23 works very much like a frame. In fact, it would be fun to use it like a frame. Can you imagine putting a photo in the center instead of a cutout? How cute would that be?!


Finally, file no. 22 is a window card where you can open all four windows to reveal a secret message or picture inside.


Oh, imagine the possibilities you can have with these cards! If you are tired of the same-old rectangle card, have some fun with these instead! What I have shown you are just some samples of what you can do but there are so many other ways to play with these cards. Make your card stand out from the others, just use Make-the-Cut with the Sweet Nothings SVG set! You can get it by clicking here.

Thursday, February 3, 2011
Itsy Bitsy Monsters

Have you downloaded your FREE Monster Love Bundle from Lettering Delights? That's a really good freebie! Thank you, Lettering Delights! If you have not downloaded yours, just click here or the image below to go the Lettering Delights website, add the bundle to your cart and check out. You pay $0!

I'm so happy that the Monsters are now available in SVG format. Do you remember when I had to convert the Monster-licious Graphic set into a cuttable set myself? Click here to see the Monster-licious post I made last June when I made these puppets for my baby from the Monster-licious Graphic Set.


I absolutely love that the bundle includes both the SVG and the Paper Pack. It is so convenient to not have to dig through my own mountain of cardstock to find a few pages that co-ordinate.
Has everybody made something with the free bundle? I really wanted to play with the Monster Love SVG and also, since I have not cut out a milk carton before, I thought that this was a great time to try making one too. If you've ever wondered how the Lettering Delights Milk Carton SVG set look like, wonder no more because I have cut out all 5 designs for you.


They're so cute, aren't they? I used the Make-the-Cut program to cut them out with my Cricut Expression. The main difference between the cartons is the unique design on the flaps. There is also one that has a window. Here's a tip if you have this set: Personally, I prefer to score the fold lines with my Scor-Pal rather than use the score lines that comes with the SVG. In Make-the-Cut, I use CTRL+B to break the whole image, then delete away all the score lines. I do cut one carton out with the score lines first to use it as a sample and I use that sample to figure out where the score lines should be. I score and crease the cutouts first before putting the box together with tape.
By the way, as I have mentioned before in this tutorial, Lettering Delights' SVGs are supposed to be imported at Actual Size and 72 DPI. If the resulting image sits a little over on the no-cut zone, just offset the paper like I showed you in this post.

I wanted a smaller carton so I reduced the imported image by 10%. That also meant that if I wanted to put monster labels on the milk carton, I had to make them small enough to fit on the box. Want to see how small these monsters turned out? Here's a picture:

Each monster measures approximaetly 1.5" x 0.75" ! They're so tiny! They're also very cute too. Even my 5 year old said so and knowing how much she freaks out at the slightest mention of "Monsters", well, that tells a lot. ;-)
Here are the three little monsters playing Ring Around The Rosy:

I stuck the finished monsters over a strip of ribbon that I had pre-attached to the milk carton and filled it with chocolate hearts. I completed the project by closing the top of the box with some twine.

So there you go, that's one more idea for Valentine's Day treats for the little monsters kiddies in your life. ;-)
Happy Cutting!
A Valentine Treat for the Teacher

Today's project is a gift for my kid's teacher for Valentine's Day. I
used Lettering Delights' Pillow Box SVG set and imported the template
into Make-the-Cut. I reduced the size by 10% so that the flap in the
front is the perfect size for the stamp.

Using Make-the-Cut, I cut out the pillow box with my Cricut using Lettering Delights' "Love is Sweet" Paper Pack. Next, I stamped Joy's "For my Teacher" stamp from the All Around Sentiments set twice- once on pink cardstock and once on white
cardstock.
I punched out the pink stamped image with a Scallop Punch and used my 2 Circle Punches on the white cardstock to get a ring. I adhered the ring over the scallop and taped the whole thing to the front flap of the pillow box. The stamped image stands out even more in the contrasting colors and it also brings out the unique design of the pillow box.
I punched out the pink stamped image with a Scallop Punch and used my 2 Circle Punches on the white cardstock to get a ring. I adhered the ring over the scallop and taped the whole thing to the front flap of the pillow box. The stamped image stands out even more in the contrasting colors and it also brings out the unique design of the pillow box.
Tuesday, February 1, 2011
How to Assemble the Lettering Delights Valentine Mail Drop Box
=====================================================================
This article was originally posted on Feb 1, 2011. It was updated on Feb 7, 2014.
=====================================================================

STEP 1:
Cut out the following pieces: Files 1, 2, 3, 4, 7, 8, 9, and 19.

STEP 2:
Adhere together the decorative sides (Files 8, and 9) and set them aside for later.

STEP 3:
Using the score lines from the cutouts as a guide, score and crease the folds.

STEP 4:
Prep the bottom piece with double-sided tape.

STEP 5:
Stick the base to the two sides of the drop box. (Pictures below only show the base being taped to one side but you should also stick the base to the other side when the first side is done.)


STEP 6:
Prepare the top/back piece (file 1). I used my ATG tape instead of the red-lined tape because this tape is more forgiving.

STEP 7:
Adhere the side cutout to the top/back piece starting from the bottom of the top/back piece.

STEP 8:
Before attempting to adhere the curved parts of the mail drop box, make sure that the top/back piece is stuck onto the straight sides of the two side pieces.

STEP 9:
Adhere the front of the top/back piece to the front of the drop box and then adjust the curved part. I had to tuck in the two curved parts so that the three pieces of cutouts (2 side pieces plus the front/back piece) all fit snugly.

STEP 10:
Adhere the top of the front piece to the bottom of the slot cutout.


STEP 11:
Adhere one side of the front down onto the drop box.

STEP 12:
Adhere the other side of the front piece down.

STEP 13:
Stick the two little flaps/sides of the slot piece to the drop box.

STEP 14:
Tuck in the top of the slot piece, and adhere it to the top of the drop box.

STEP 15:
Adhere the prepare pieces from Step 2 to the two sides of the drop box.


STEP 16:
Decorate the front of the drop box to your heart's content or just sit back and enjoy the assembled Valentine Mail Drop Box.

Subscribe to:
Posts
(
Atom
)