So you've seen these Cards and Envelopes on the Lettering Delights website:
Ever wonder how they really look like all cut out? Well, wonder no more because I have just done it for you! :-)
What's that? Did you just gasp? Yeah...I did that too. Aren't they preettty? ;-)
If you import the files at 72 DPI and with the box next to "Actual" checked, you will find that each one of these cards will measure about 4.25" x 5.5" when cut and folded. Envelopes B SVG set was made to match with the Card B SVG set. I just love the decorative trim on the envelopes.
On the website, you can't tell that Card no.9 has little scallop edges while Card no. 10 is a tri-fold card. Envelope 5 is supposed to be a wrap and you can hold the ends together with a sticker or ribbon while Envelope 9 is really a sleeve.
By the way, there are two things that you need to take note of when you are cutting envelopes 1, 8, 9, and 10. When you import the SVGs onto the mat, you might notice that the image goes beyond the cutting zone of the mat. Let me show you how to work around that:
envelope_1 and envelope_10:
After importing the svg, rotate the image so that all the lines cut within the cutting zone on the mat.
envelope_8 and envelope_9:
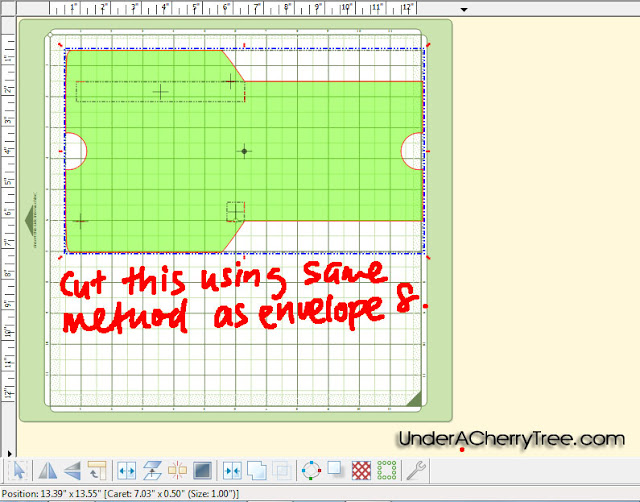
If you are a Make-the-Cut user, you are probably aware that there is a no cut zone on the cutting mat. Basically, it means that the Cricut is unable to cut outside that boundary. However, MTC can make the Cricut cut beyond the border on the right side of the mat.
You can cut envelopes no.8 or no.9 on a 12" x 12" cutting mat with a 12" x 12" sheet of paper if you manipulate where the paper goes on the mat.
For envelope _8, just move the image as close to the left side of the cut zone as possible. Place the paper on the cutting mat so that it is offset to the right of the cutting mat. Like that:
When you click on the Cut button (blue scissors button), a box will pop up with the message that there is something beyond the cut zone and if you want to continue with the cut. Just click yes and the Cricut WILL CUT the whole envelope out even though a bit of it is in the no-cut zone.
You can use the same method to cut out envelope 9 although you might like to rotate it 90 degrees first.
Here is an additional note about the score lines on the envelopes. Personally I don't like the score lines to show so I just delete them off. I will show you how to do this in 2 steps in a different tutorial.


Thanks so much for this tutorial! I have looked at these cards and wondered what they were all about. I will definitely take a second look now.
ReplyDeleteCool! I love these shaped cards.
ReplyDeleteThanks Jin,
ReplyDeleteThis info about cutting in the
"no cut zone" is really nice to know for those slightly oversized files.
The cards are really nice, I had been hesitant to purchase them, but seeing them cutout with the envelopes makes all the difference.
Yep, I gasped! I'll be getting these!
ReplyDeleteJin! I have shied away from these simply because they look kinda complex, but you make it look so easy! Thank you!
ReplyDeleteWow! I love a visual. Now I will get them, now that I see how beautifully they turn out. Thanks for sharing. :)
ReplyDeleteThanks for cutting these! They look more appealing now that I see them cut out. Are all of the cards and envelopes the same just different sizes on the LD site? Or can you just get one set and resize them if you want?
ReplyDeleteI love LD card formats...they really are beautiful!
ReplyDeleteI don't like those score lines either! I'll have to look for your two step tut to eliminate them, but I think I have a pretty good idea how to do it. Gotta love that delete option!
ReplyDelete