This page may contain affiliate links. If you click and make a purchase through these links, I may earn a small commission at no additional cost to you. Click here to see my full disclosure policy.

Showing posts with label lettering delights. Show all posts

Tuesday, March 29, 2011

Rosettes? Rosettes!


I noticed that many of you have wondered how the Lettering Delights' Threaded Rosettes look like when cut out and assembled, so I thought I would make a couple to show you how the finished rosettes should look like.

From the picture above, the red and pink flowers are from yesterday's Freebie. You can grab it from here. I realized that if the thread holes were large enough, it is better to use twine rather than a thin thread to thread through the rosette. I used regular twine to pull the folds together for the blue layer as shown in the picture below:


I adhered the two layers together with hot glue.

These flowers do take some time to put together. One has to be pretty patient when making them, especially when each layer has so many folds. I think that the efforts are well worth it though cos' I just LOVE the flowers I made. 

To get your freebie rosette, click here.

To buy your Threaded Rosette Svg set, click here.


Thursday, March 3, 2011

berry best WISHES


Inspiration comes easy with Joy's latest set of stamps. Yummy Puns is definitely her best work yet! Today, I am using a stamp from that collection to complete my card. Using my favorite Make-the-Cut tool, the Shadow Layer, I made a shaped card by creating several shadow layers with the command CTRL+H (or Shape Magic>Shadow Layer). 
 

The strawberries are from Lettering Delights' Sweet Nothings SVG set. The sentiment was stamped on a rectangle. I made the 2 decorative edges by using a border punch. A piece of twine wrapped around the card and tied over a button completes the card.
 

Joy is offering free shipping on all Joy's Life products until March 8. Click here to check out her stamps and dvd.


Wednesday, March 2, 2011

Read Across America Day! Create a Book Blog Hop plus a special giveaway.


It's the NEA's Read Across America Day and it's also Dr. Seuss' Birthday today!


Thank you for joining us on the Create A Book Blog Hop hosted by Joy of joyslife.com

The following is the list of blogs who are participating on this hop. Did you come here from Rosy's blog? If not, just click here to start the hop from Joy's blog and keep hopping until you're back here. In case you get lost hopping, just come back here and refer back to the list below to get back on track. 


 ***
This hop is really special to me because we love books in our house. My kids are avid readers and I love to use my Cricut to write stories for them. Here are a few stories that I have written for my daughters:


By the way, in case you are wondering, Pan-Dee is my youngest daughter's lovey. :-)


For today's hop, I made a special little tab-style board book. The entire project was created with Make-the-Cut, my Cricut Expression machine, the Canon PIXMA MP250 Inkjet Printer and SVGs, Graphics, Fonts, and Papers by Lettering Delights. I do not use nor own a Cricut Imagine.

This book was inspired by my three daughters who are 8 years old (twins) and 5 years old (Baby Sister). The main image on the front cover was cut out with Make-the-Cut using the Print-and-Cut technique. All the pages are made strong with cardboard from cereal and cracker boxes. The book was put together with Zutter's Bind-it-all.

Here is our book of words to remember; words that Hubby and I tell our children so very often... 


I hope that you enjoyed my book. This is the list of Lettering Delights products that I used:


Because no blog hops should go without a giveaway, I have blog candy too. Since Read Across America was started to celebrate the joy of reading, today's giveaway is special and is something that you can win for the little one in your life. I am giving away ONE Dangerous and Daring Gift Set for Boys and Girls.


Here's how to win:

You must be a follower to enter in the giveaway. If you are not already a follower, just click on the "Follow" button on the right.

Leave ONE comment on this post

Make sure that you leave your email address or any other form of contact so that I may inform you if you win.

Due to the heavy weight of this item, this giveaway is only open to U.S. Residents with a U.S. Mailing Address.

Entries to the giveaway will be accepted from now until Wednesday Mar 9, 11:59pm PST. The winner will be chosen by RANDOM.ORG and announced on Thursday Mar 10, 2011.

***

If you're ready to continue on your hop, your next stop is Melissa's Moe Creations. 

Happy Blog Hopping, and don't forget to Read a Book Today! ;-)


Monday, February 21, 2011

Sweet Nothings? Sweet Everything!

Happy Monday! Did everyone have fun blog-hopping on Saturday? If you missed the hop, it's not too late to join in the fun. Just click here or scroll down to the post below to start hopping. You can still enter in the giveaways too as the entries are accepted until tomorrow on most blogs.

While I was busy preparing for the hop, I noticed that Lettering Delights had quietly slip in a couple more new SVG sets on Friday afternoon including this Sweet Nothings Tag Cards:


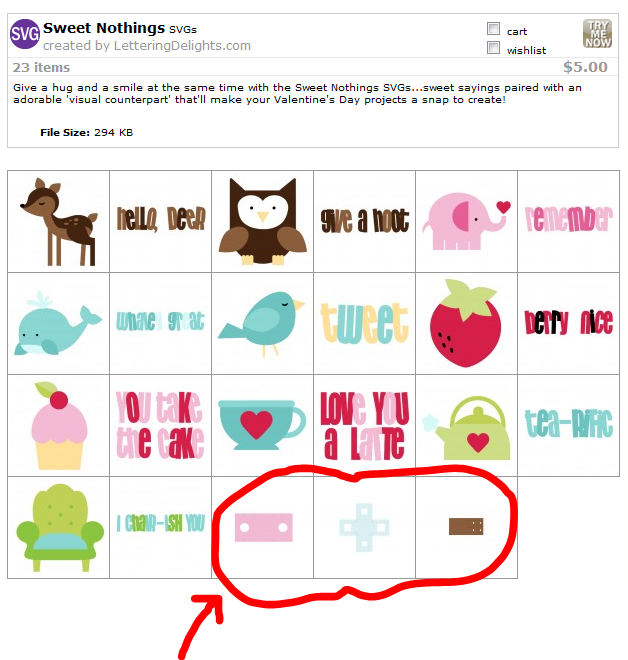
Take a closer look at the last three files.

These look like another set of interesting cards. I guess I'll have to cut them out to see what they really look like. I'm also thrilled that there is a Sweet Nothings Paper Pack that coordinates with the whole Sweet Nothings Collection. Less time looking for matching paper means there's more time to cut and glue! Just load the cardstock and print! With Make-the-Cut! (like I showed you here)


Here are the other sets that were released on Friday. Just click on the image to take a closer look.
Hmmm...no Ophiuchus?


Thursday, February 17, 2011

I'd love to SEA you!


Today I will show you how I use another one of Joy's Lots of Pun stamps with Lettering Delights' SVGs.

 
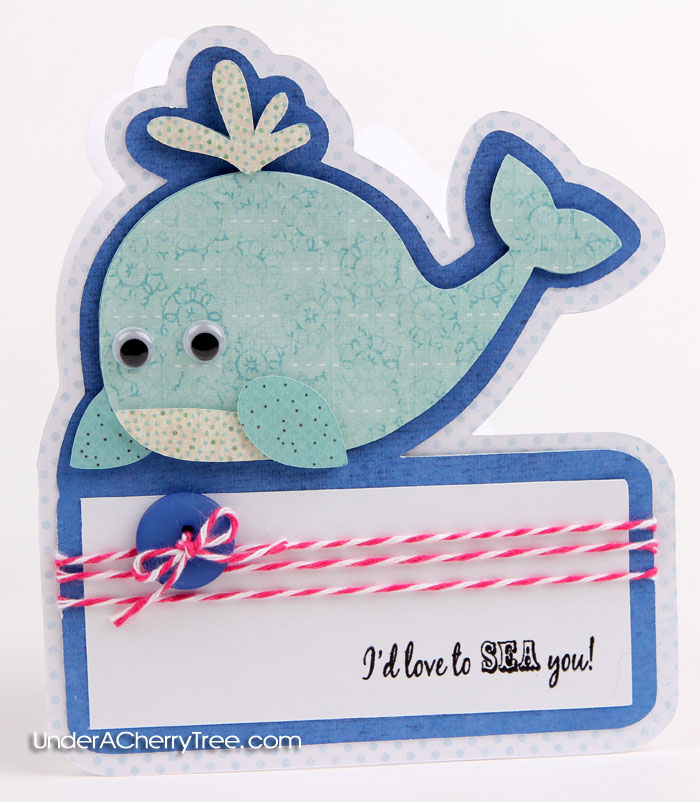
I used Make-the-Cut to import the whale from Lettering Delight's new Sweet Nothings SVG  and created a shadow layer of it with a rectangle box. A shaped card base was made by welding 2 additional shadow layers. I stamped the sentiment and finished the card with twine and a button. Easy, Easy, Easy!


Click HERE to see Lettering Delight's new Sweet Nothings SVG now.


Wednesday, February 16, 2011

Lettering Delights' Sweet Nothings SVG Set


By now you might have seen Lettering Delights' Sweet Nothings SVG set. If you take a closer look at the cuts that are on it, you might wonder what the last three files are for. 

The three files are actually cut files for some really fun and very unique-looking cards. Let me show you how to use them.


File no. 21 opens like a bi-fold card with a circle cut-out in the center. I used Make-the-Cut to make this "Hello Deer" card. This card is so easy to make! Lettering Delights has already done the hard part by coming up with the unique design of this card. All that I had to do was to put a focal image and the greeting. By the way, the deer and the greeting are also from the Sweet Nothings SVG set.


File no. 23 works very much like a frame. In fact, it would be fun to use it like a frame. Can you imagine putting a photo in the center instead of a cutout? How cute would that be?!


Finally, file no. 22 is a window card where you can open all four windows to reveal a secret message or picture inside.


Oh, imagine the possibilities you can have with these cards! If you are tired of the same-old rectangle card, have some fun with these instead! What I have shown you are just some samples of what you can do but there are so many other ways to play with these cards. Make your card stand out from the others, just use Make-the-Cut with the Sweet Nothings SVG set! You can get it by clicking here.


Tuesday, February 15, 2011

Tutorial: How to Print Lettering Delights' Papers with Make-the-Cut


Do you know that you can print Lettering Delights' papers with Make-the-Cut? I usually print them with Adobe Photoshop but you can also print the papers with Make-the-Cut v3.2 (or v3.2.1).

Today's tutorial will show you how to print a paper from the Lettering Delights' Love is Sweet Paper Pack with Make-the-Cut (v3.2.1).


Step 1. Load paper or cardstock into the printer.

2. In Make-the-Cut, click on the Import Basic Shapes button (next to the SVG button). Go to the Polygons tab, scroll down and double-click on "rectangle" to bring it to the mat. Close the Basic Shapes window.


3. Back on the mat, select the rectangle and bring your mouse to the top where the X,Y,W,H is. Click on the lock to unlock the aspect ratio. Change the X and Y values to 0 and the W to 8.5" and H to 11". Hit Enter.

 
4. Bring your mouse back over the rectangle and right-click to Change Color/Texture, then Select Texture.

5. Locate your paper and hit "Open" and then "OK".


6. The "Choose Texture" window will close and it may seem like nothing is happening. Just wait for a few seconds and you will see a shadow of the texture inside the rectangle on the mat. Because textures take up a lot of memory, the length of the wait may depend on the amount of RAM on your computer and also the size of the texture being imported.

7. Go to the Virtual Mat tab on the right and uncheck "Outline Shapes"
 

8. Go to File, and click on Print Preview and if you are happy with what you see, just click Print!


That's all there is to it! Super easy, right? ;)

I print the Lettering Delights papers on White Cardstock by Georgia-Pacific. You can find it at Walmart where a pack of 150 sheets costs around $6+. Also, I have to mention that one of my favorite Lettering Delights paper packs is the Love is Sweet Paper Pack. This pack contains 10 different designs of paper! For only $2! The papers are also definitely suitable for use all year long.


Here are a few more Lettering Delights paper packs that I like or have used for my cards. Even though some may look seasonal, you can definitely use the papers all year round too. 


To see more Lettering Delights paper packs, just click here.


Edit (on 2/15) to add:
To print papers, I mainly use my Canon PIXMA MP250 Inkjet Printer. You can see the box in my post here. Occasionally I do print with my Samsung Color Laser Printer and for 12"x12" papers, I use my Canon PIXMA Pro9000 Mark II.


By the way, for those of you who prefers to watch the instructions on a video, here is the same tutorial on video: