This page may contain affiliate links. If you click and make a purchase through these links, I may earn a small commission at no additional cost to you. Click here to see my full disclosure policy.

Showing posts with label halloween. Show all posts

Sunday, October 31, 2010

Pan-Dee Meets a Spider


Sing to the tune of "I'm a little teapot"...


Panda: Create-A-Critter Cricut cartridge
Spider and Web, Tree, Bats, Tombstones, House, Cat : Hallowscream Things by Lettering Delights
Hat, Ghost, Trick-or-Treat Bag: DB Haunted House by Lettering Delights
Cut using Make-The-Cut and the Cricut Expression.


For more Pan-Dee posts, click here:


Friday, October 29, 2010

$1 Treat


Seriously, all these for a buck?

 
I really thought that this was a price mistake. I mean, 6 fonts that was $18 is now just a buck? Gotta be a mistake, right? Well, turns out that this is LD's treat for their customers. That DB Haunted House alone is already worth that dollar. Be aware though that this font needs a little clean up before they can be used to cut with MTC cleanly. That's because there are small tiny dots within each design. I just clean the image up by "breaking" with CTRL-B and deleting away those spots. Also, LD Peek-A-Boo looks like it can also be used for occasions that is not related to Halloween. Nevertheless, the bundle is still crazy cheap and if you have a coupon, it will cost even less! How's that for a treat? ;-) 

Click here or the image above to get it and if you have not downloaded the free treat bag, you can also go here to add it to your cart and checkout.


Thursday, October 28, 2010

3 Pumpkins


It's time to clean up the aftermath of Halloween crafting but I can't resist making that one last card with these scraps that I found on my desk. By using the pumpkin from LD's DB Boo Ya and replacing the face with designs from LD's Jack-O-Patterns 2, I cut out several pumpkins that had different looks.
To do that, I used MTC and added the DB Boo Ya font. Then I clicked on the pumpkin to put the image onto the mat.
Using CTRL-B, I "Break" the image and delete the face.
Next, I used the Jack-O-Patterns 2 font and click on a pattern that I want to replace the face with.
I adjusted the size of the face and position it onto the pumpkin. I used CTRL-J to join the images together to get this:
Ta-da! A pumpkin with a new face!

By doing the same steps over and with the different faces in the Jack-O-Patterns set, I came up with a whole bunch of different looking pumpkins.
 These are super easy and super fun. Cut them out big and with vinyl to decorate around the house or cut them out small to use as tags. I cut the pumpkins out using my scrap paper and layered them on a card with foam tape. Quick, easy, fun!


Tuesday, October 26, 2010

Halloween Treat Bags


"Slacker Mom". That's what hubby called me this morning. All because I decided to stay at home instead of volunteering in the classroom like I was supposed to. Never mind that I am not over my cold and cough that I've been battling against all week. I'm a slacker. :-(

Speaking of slackers, raise your hand if you are still not done with the goodie bags that you promised your kids you would make for their classmates. Well, my friend, don't worry because I have an idea for you today.


I found this template from the Stampinton website and I cleaned it up for use with MTC. You can download the original template by going to the Stampinton page or simply download the MTC file by clicking here.

Just score, fold, and glue (or tape like I did with the ATG). Wrap a ribbon around the bag to pretty it up and stick on a label made with the LD Little Halloween Notes doodlebat font. I used the text tool in Adobe Photoshop and typed each letter/label at a text size of 150. Each circle will measure approximately 1.5inches across. I printed and punched out each label with my circle punch and layered it over a punched out scallop. (Hint: To remove the lines on the labels, Merge Layers and use the Eraser tool to erase away the lines.)

My kids love to stuff the treats into the bags so I just tell them to finish up with that. I've done the cutting, gluing, punching, candy-buying and now I will get the kids to do the rest. After all, I'm a slacker mom. :P

Thursday, October 21, 2010

Coffin Treat Box (NOT from Happy Hauntings cartridge)


One of the reasons why I was tempted to buy the Happy Hauntings Cricut Cartridge was that it has a few interesting 3-D projects including a coffin-shaped favor box. Of course when I finally decided to order it, it's back-ordered and I'm not hopeful that it'll arrive at my mailbox with enough time left for me to make the boxes. Lucky for me, a search for "coffin favor box" on Bing.com yielded quite few free downloads of the box. I decided to get the template from Martha's site.

I downloaded the 2 free .pdf files quickly and imported them into MTC. I used "Break" and "Delete" to remove the page title. I also had to remove all the score lines because MTC had imported them as solid cut lines.

 Because I am nice, :-D I will share the cut file with you so that you do not have to do all the boring Break-Delete work. Just click on this link to download the MTC file. You will need to have the MTC program to open the file. (Edit oct 24/11: .studio file added. Just click here to download. Select the 2nd file.)


I used a double-sided 12"x12" sheet of printed cardstock to cut out both the top and bottom of the box.

Even though I had removed all the scorelines, it wasn't hard to figure out where the folds should be. Just align the two ends of the two adjacent cut lines and crease away.

The bottom is quite deep at 2" so I was able to use my ATG tape to stick the cut sides down. The top is more shallow so I used my Zip 2-way glue pen instead. I placed some clips on the glued sides for a short while to hold down the sides while the glue dries. Did you notice that the clips matched the color of the cardstock? :-D


This is how the box looks like when it's done. Creepy, huh? *shudder*


What shall I put in it? Candies? Lollipops? How about a mummy?


A Musketeer mummy. How fast can you say "Mummified Musketeer"? Haha!


Eek! There's a spider on the Mummy!


I printed a label with LD Frightmare and stuck it on the box.Then I took a piece of kitchen twine and colored it with my Memories Dye Inkpad (Chestnut Brown). I wrapped it around the box, tied a knot, and the project is completed.


The top of the box seems a bit larger than it should be but it did not bother me. If you want a tighter fit, you might want to adjust the template for the top in MTC.


Credit for the mummy goes to Julie of the Paper Jewels blog. My kids and I made a whole army of Chocolate Mummies last year. They were so fun to make! The size of the Hershey's chocolate bar is too big to fit into the box so I made one out of the Musketeer bar instead. If you prefer to put in a Hershey's Chocolate Mummy in the box, just make the necessary adjustments in the MTC file. No matter what you prefer to fill the box with, just have fun making them. I really got a kick out of putting this one together. Have a great day creating!

Monday, October 18, 2010

Kitty Cat Note Cards and Treat Bag


Here's an idea for a super quick note card. Using the cat image from LD's Witch One and Make-the-Cut, I traced, broke, and cut this:

The cat is set at a width of 5.25" and a height of 5.2642". The note card base measures 6.5" x 3.25" when unfolded. Just cut and glue the pieces to get this quick note card:


 I made a couple to put in my kids' lunch boxes but then I decided I would make a treat bag to store the cards in:


Isn't the bag cute? I was really delighted at how it turned out. To make it, I adjusted the cat image so that it measures at a W=8" and H= 8.0208". I cut off the top of a standard lunch bag so that it is about 5" tall before I adhered the cat face to one side with my ATG tape gun. For the back, I used MTC to cut and delete the cat's mouth and I cut off the whiskers with MTC's Boolean Join before sticking it to the bag. Of course the whiskers could also have been cut off with a pair of scissors but I really just wanted to play with MTC. :-P  My ATG tape is pretty strong and after playing with it, I'm confident that the bag will hold up if I do not put too many heavy candies into it.

My kids squealed when they saw the bag and are asking that I make them for their class for Halloween. These are so easy to put together, I think I might do just that. :-)


Tuesday, October 12, 2010

Candy Coma


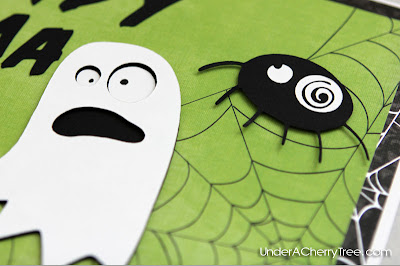
Spookacular is LD's Sneak Peek of the Month. You can only buy this set if you are buying something else. This set is offered to you when you are checking out your cart. I just downloaded it and the first image that I converted was this crazy looking pumpkin. Doesn't that look hilarious? I couldn't put a finger to what that face is reflecting until I showed the spider and the ghost to Hubby. As soon as he saw it, he said "Candy Coma!" I guess that's the look I have when I have too much sugar. Haha!

Once again, I broke the layers up in Adobe Photoshop and traced them all at once in MTC.


They look so cool when they have been cut out. I have to mention that cutting the spider's eye was quite a challenge. Even though the cut looked perfect on the MTC screen, the Cricut's blade kept picking up the tip of the spiral and ripping the eye in the process. The eye was torn before it has finished cutting. By using a new (and very sticky) mat and setting the machine's cutting speed to LOW, I finally solved the problem and cut out a perfect spiral spider eye.


The layers of the pumpkin and ghost were adhered with foam tape. I thought they looked pretty cool when I finished assembling them. :-)


I used the font LD Horror Movie for the sentiment.


Foam tape was used to stick the spider to the card for added dimension.


 I put together the card with background papers from the  Midnight Spell stack by DCWV.
 

We're now just about 19 days away from Candy Halloween. Can't wait to count how many Candy-Coma faces I'll see this year. ;-)


Saturday, October 2, 2010

Calendar Makeover


Entries for the cartridge give-away is now closed. While we're waiting for time to pass before I announce the winner on Saturday at 10am PST, let me show you what I did on Friday. 

We have a whiteboard magnetic calendar in the craft room and boy, am I tired of writing the dates on it every month. October being Halloween Month, I thought I would do something different. I gave the calendar a makeover.

Using Make-the-Cut and Lettering Delights' LD Frightmares and DB Halloween Little Notes, I made a header for the calendar:


 By removing the outer pattern of the original frame image and joining the letters into it, I came up with these 3 layers. The base (green) layer was made by creating a shadow of the orange layer.

Here's a tip that you can use when you glue together letters or images with inside cuts like the letters "B" in the picture below. To more accurately glue the cutouts onto the layer, I place the letter "B" back into the header WITHOUT gluing the letter down. Using it as a template, I am able to position and glue the inside cuts. I remove the letter "B" when the inside pieces have been adhered to the orange layer.


I probably should have taken a picture at this point where I placed and glued down the inside black pieces while the letter "B" is still in position but I think you would get the idea.


Next, I used the witch's hat from the DB Boo Ya doodlebat font set and joined the image with numbers from LD Frightmares. After I have cut these numbered hats out, I "break" and delete the numbers and cut the hats again (with no numbers) to form the bases.


Here is the pile of hats waiting to be put together:


I adhered a small piece of adhesive-backed magnet to every hat and the header to make it stick to the magnetic calendar. Stickles never fail to make a cutout pop.


 Hello Spider!


 The web is also from DB Boo Ya while the spider is a Jolee sticker.

This is the calendar before I "dressed it up":


Here is the calendar with the new header and dates:


After making these magnet dates for the calendar, I don't think I can go back to just writing the dates on the board. These are definitely more fun than hand writing and to have the kids enjoy them is such a sweet bonus.
***

We are just hours away from finding out the winner of the giveaway. Please check back at 10am PST, Oct 2 to see if you have won.