This page may contain affiliate links. If you click and make a purchase through these links, I may earn a small commission at no additional cost to you. Click here to see my full disclosure policy.

Showing posts with label LD-MTC Beginner Series. Show all posts

Friday, January 14, 2011

LD-MTC Beginner Series: How to use Pixel Trace in MTC


If you are just joining us in this series, you have missed the following chapters:
 
1. Why I am writing this series: 
Because I once was a newbie...


2. Who this series of tutorials is for: 
LD-MTC Beginner Series: Why you need this. 


Today I will show you 

How to Pixel Trace a Lettering Delights graphic in MTC.

I have left this topic to the end of the Beginner's Tutorial Series because using the Lettering Delights' graphics in Make-the-Cut can be a little tricky sometimes. As I have mentioned in this tutorial, the easiest type of graphic to trace are those that have little details. Solid, and bold designs will trace a lot easier than those that look textured or hand-sketched. In today's tutorial I will show you how to use the Pixel Trace tool in Make-the-Cut to bring an image onto the program's cutting mat so that you can cut out with the Cricut.
Because this tutorial is tailored for the beginner MTC user, I have selected 2 LD sets that can be easily traced. With practice, I am sure that you will be able to use the Pixel Trace tool more effectively.
An image is made up of many dots (or pixels). To Pixel Trace basically means, to connect those dots, thus forming a path and making an outline for the image. The darker the dots, the easier it is to trace. The LD Pun Intended set contains one of the easiest LD graphic to trace into MTC. To demonstrate the Pixel Trace tool, I will show you how the elephant image can be easily traced into MTC.


1. In MTC, click on the Pixel Trace button. Locate your graphic and click Open.


2. Click on the Import button to bring the image into the mat.

3. This image is easy to trace because it does not have much details at all. When you are pixel-tracing, the idea is to bring in all the necessary layers so that you can cut and assemble. In this case, the tool managed to easily trace the outline of the elephant as well as the outline of the elephant's ear. 


4. Resize the image by reducing the Width (W) or Height (H) but make sure to keep the Aspect Ratio locked.


5. Use the Ctrl+L to create the layers of the elephant.


In this next example, I will show you how to trace a graphic that is slightly more difficult to trace. I am using the bird from the LD Inch by Inch graphic set.


Ideally all the layers of the graphic should be traced in a single trace but sometimes it takes more than one trace to find all the layers.

1. Once again, click on the Pixel Trace button, locate your graphic, and click Open. 


2. The outline on the preview box shows what was traced. The Threshold has to be adjusted until the outline of the desired layer is shown in the preview box.


3. The threshold always starts at 127. Adjust it by increasing (or decreasing) in multiples of 5 or 10 and click Apply Changes. For this bird, I had adjusted the threshold in increment of 10 until I reached 230. I adjusted downward from there and found that I could bring in the first layer at a threshold of 225. I clicked Import to bring the first layer onto the mat.


4. The second layer was brought in at a threshold of 226 while the third was found at 227.


5. At this point you have all the layers that you need to cut and assemble the bird. You can resize the bird the same way as you did the elephant in Step 4 above. If you like, you may even go one step further and modify the layers to your preference.

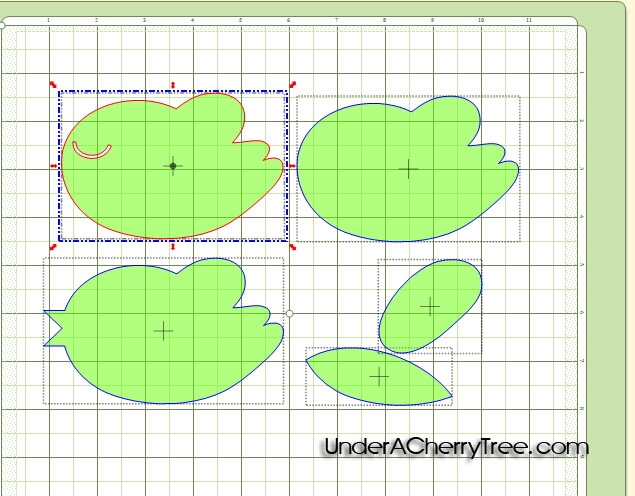
I am not a fan of small tiny layers and I try to modify the layers by following the style of the Create-A-Critter cartridge. In this case, I am going to join the "eye" layer into the body and add an extra black body layer under it so that the eye shows. 


7. To do that, I make a copy of the body by using Ctrl+C, and Ctrl+Shift+V to paste-in-place. I set one copy aside. 


8.Next move the eye and wings layer over the other body layer. Align both layers by using Right-Click, Align and Space, Align, Horiz. Center.


I use Ctrl-B to separate the wings from the eye. 


 9.Next, I select the body and the eye only and use Ctrl-J to join them into one layer. Now I have all the layers that I want.




 Here's a video for you:


Personally, I like to use Adobe Photoshop to separate the layers of a graphic before tracing in MTC. If you have Adobe Photoshop or Adobe Photoshop Elements, you might want to refer to this tutorial to see how I use the program to separate the layers and prepare the graphic for tracing in MTC. This is the video I made for that tutorial:


It's the end of the week and I hope that you have all enjoyed my LD-MTC for Beginners Series. Make-the-Cut is such an awesome program with so many wonderful tools that it is impossible for me to cover all the features of the program in a week. I barely even scratch the surface with this week's tutorial! I decided not to show on the blog the rhinestone tool, the lattice effect, wrap to path and of course, Print-and-Cut, because in my opinion, they are topics that are more appropriate for the intermediate and advanced user.

Due to the length of today's tutorial, I did not managed to show you the steps to make the elephant and bird cards. The tools that I used to make them are already shown in this week's tutorials. If you have followed them, there should be no problem for you to make these cards without the step-by-step instructions.


I hope that with this mini-series I have answered Anna's questions and also any others that have been posted by the new users of MTC. If I have helped you with these tutorials please let me know or even better, if you have made a card using my tutorials, do post in my Under A Cherry Tree facebook page. I would love to see what you made. Also, if you have any ideas on what I should demonstrate in my future MTC tutorials, please let me know by leaving a comment below.
Thanks, everyone! Have a SUPER weekend!

Thursday, January 13, 2011

LD-MTC Beginner Series: VIDEO! How to Weld, Join, and Center-Align in MTC

 
If you are just joining us in this series, you have missed the following chapters:
1. Why I am writing this series: 
Because I once was a newbie...

2. Who this series of tutorials is for: 
LD-MTC Beginner Series: Why you need this. 


Today I will show you 

How to Weld, Join, and Center Align in MTC.
 
We are making a Thank You card and you will need:


  • 1 White cardstock for the card base, 5.5" x 8.5" folded into a 4.25" x 5.5" card
  • 1 sheet of Colored/Patterned cardstock, 4" x 5.25" (or 4.25" x 5.25" if using border punch
  • 2 small sheets of different colored/patterned cardstock (approx. 2.5" x 6")
  • 1 piece of twine or ribbon
  • tape and foam tape
  • border punch (optional)
  • rhinestones (optional)

If you do not already have the Delilah Tags SVG and LD Cursive font, just click here and here to add to your cart. Check out and follow the instructions to download to your computer.


Let's start:
1. Load LD Cursive font into Make-the-Cut. To learn how to do that, please look at Step 8a and 8b in this tutorial.


2. Click on the "Add a group of characters" button and type "Thanks".

Check the box next to "Auto-Split" and leave the box next to "Vertical" unchecked. Click on Add.


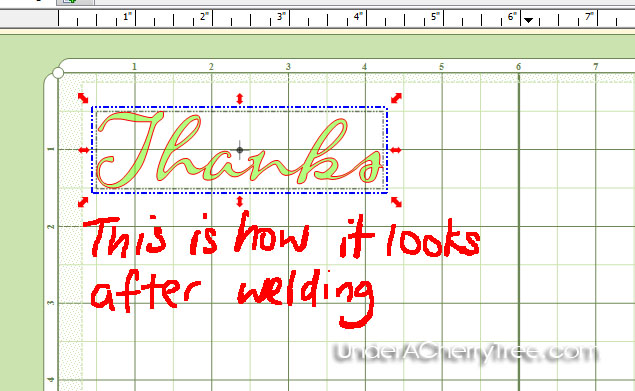
3. Keeping the blue bounding box on the mat (it should enclose all the letters), press CTRL+W to weld. You may also do the same using your right mouse button and selecting Shape Magic, and Weld.

 BEFORE:


AFTER:


.
4. With the Lock Aspect Ratio on, change the height (H) to 0.75" and press Enter (on your keyboard). The width (W) will adjust automatically.


5. Click somewhere on the mat to remove the blue bounding box and import delilah_tags-04.svg into MTC. To learn how to import an SVG, please look at Step 2 and 3 in this tutorial.


6. Reduce the size of the tag by changing the width (W) to 5". 


7. Separate the two layers of the tag and bring the top layer over the "Thanks" word.


8. Select both the word and the oval layer: Moving your cursor to the top left corner of the 2 layers, hold down the left-mouse button and drag out a blue rectangle that is big enough to box in the oval and the word.


Right mouse click and select Align and Space, Align, Stack.


9. Now you can join the word and oval layer together by using Ctrl+J or right-mouse click, Shape Magic, Join.


10. Arrange all the layers in MTC, and load the papers and mat into the Cricut machine. Cut.


11. Adhere the top "Thanks" layer to the bottom fancy frame with foam tape and put together the card with tape. 


If you like, you may embellish with rhinestones and a ribbon or twine. You may also add a decorative edge on the bottom with a border punch.


This is just an additional note about the welding done in Step 3: Because of the way the font looks, it seem like the letters are already joined when they really are not. If the letters are not welded together, the Cricut will cut out all the outline of each letter, leaving many little pieces of letters on the mat. On the other hand, when the letters are welded together, the Cricut will cut the letters (that are touching) as 1 piece.


Here is another video for you:


If you managed to follow in my tutorials and make a card, I would love to see it. Cindy has made a card using my Cupid Card Tutorial. You can take a look at it over at the Under A  Cherry Tree Facebook page or over at Cindy's blog. Thanks for sharing your card, Cindy! :-)


Wednesday, January 12, 2011

LD-MTC Beginner Series: VIDEO! How to use Shadow Layer and Align in MTC


If you are just joining us in this series, you have missed the following chapters:
1. Why I am writing this series: 
Because I once was a newbie...


2. Who this series of tutorials is for: 
LD-MTC Beginner Series: Why you need this. 


Today I will show you 

How to use Shadow Layer and Align in MTC.

I love making little shaped note cards. They are easy to make and you can make a lot of them in very little time. I like to sneak these note cards in my kids' lunch bags sometimes because I know that they've always enjoyed the surprise. 

Note cards that I have made with Lettering Delights graphics include:
and


Today, I will show you how to make a Penguin note card using the Shadow Layer feature in Make-the-Cut.

You will need:

  • 1 sheet of black cardstock
  • 1 sheet of white cardstock
  • 1 sheet of colored cardstock (I'm using blue)
  • 1 pair of googly eyes (1 large, 1 medium)
  • glue
  • foam tape
  • DB Animal Occasion Doodlebat font from Lettering Delights

If you do not already have the widely popular DB Animal Occasions doodlebat font, you can go here and add it to your cart. Follow the instructions to check out and download the font to your computer.

1. Open MTC and load the doodlebat font the same way as you would a true type font. This is shown in yesterday's tutorial in Step 8. Scroll down the side bar to see the images.

2. Double-Click on the penguin to bring it to the mat.

3. With the Lock Aspect Ratio on, re-size the penguin by changing the width (W) to 4". The height (H) will automatically adjust.

4. Make a Shadow Layer by right-clicking your mouse, select Shape Magic, followed by Shadow Layer or using Ctrl-H or by clicking on the Shadow-Layer button as pictured below:


5. Move the slider bar to set the Shadow Width. I used 0.1000". Click on Apply Blackout and Accept.


6. Remove the blue bounding box by clicking elsewhere on the mat and separate the Shadow Layer from the penguin. Let's call this first shadow layer, A. 


7. Select A and make a Copy of it by using Ctrl+C (hold down the Ctrl and C keys together). Paste it back onto the mat by using Paste-in-Place (or Ctrl+Shift+V). Now you have two copies of Shadow Layer A with one laying over the other. Separate the two copies of A by dragging one copy out to the right. Let's call the left copy B. 


 8.Move your cursor to select B. Use Ctrl+M to make it into a mirror image of A. Put the two copies side by side. They do not have to touch but they must not overlap. 

10. Align the two layers so that they are sitting on the same level. To do this, select both copies of the shadow layers by "drawing" a blue bounding box around them. You can do this by moving the cursor/caret to one corner of B and while holding down the left mouse button, drag the cursor out so that the box is extended. Next, right-click and select Align and Space, followed by Align, then Horiz. Center. 


11. Make a shadow layer of A and B to make the card base by selecting both and using Ctrl-H. Set the shadow width to be about 0.2500". Click Accept.


12. Click outside the blue bounding box and back on to Layer B. Delete it by pressing the Delete key on your keyboard. 


13. Select the penguin and click on the Layer button. The two layers of the penguin have just been created.


14. Separate and arrange all the layers of the penguin note card. If you find that there are too many layers to fit on one mat, you can move them so that they are on 2 pages instead. Just add a page and use Cut and Paste-in-Place to move some layers to a different page.


15. Before cutting, remove any excess nodes by selecting each layer and doing a Ctrl+Shift+Z. Keep doing this on the layer until you see the message "This path cannot be simplified any more than it already is", before moving on to the next layer.


Here is a video tutorial for those of you who prefers videos.


16. Load cardstock and mat into the Cricut and cut.


17. Remove all the cut outs and assemble the note card using glue and foam tape and Voila! Your note card is done!


See? 'Told you it was that easy! :-)


Pin It