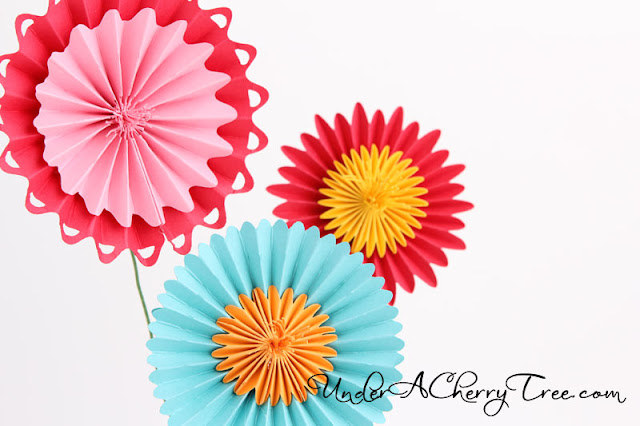
I noticed that many of you have wondered how the Lettering Delights' Threaded Rosettes look like when cut out and assembled, so I thought I would make a couple to show you how the finished rosettes should look like.
From the picture above, the red and pink flowers are from yesterday's Freebie. You can grab it from here. I realized that if the thread holes were large enough, it is better to use twine rather than a thin thread to thread through the rosette. I used regular twine to pull the folds together for the blue layer as shown in the picture below:
I adhered the two layers together with hot glue.
These flowers do take some time to put together. One has to be pretty patient when making them, especially when each layer has so many folds. I think that the efforts are well worth it though cos' I just LOVE the flowers I made.
To get your freebie rosette, click here.


They're so cute.
ReplyDeleteIndira
u r awesome. thanks 4 the visual. i was struggling a bit.
ReplyDeleteBeautiful! Thanks for the little tutorial. How is the MTC working with the cutting machine?
ReplyDeleteThanks, I was wondering...
ReplyDeleteThose are awesome
ReplyDeleteI love the blue one!! These are the nicest looking rosettes I have seen on the web, thanks for sharing this!!
ReplyDelete-rwk
rwkrafts.blogspot.com
So cute and pretty!! I totally went and bought them - can't wait to try them myself!! Thanks, Jin!
ReplyDeleteWow...I got the SVGs from LD and it didn't even occur to me that I could use and actual item to thread these together. All I did was punched out a paper circle and used tacky tape to keep them in place! But now seeing yours, I can put more variation into my next ones! Thanks Jin, your postings are awesome as always!
ReplyDeleteThey look awesome! Would you be able to clarify for me the difference between this one and the accordion fold rosettes? I would love the see the other one made as well! Thanks!
ReplyDeleteHi Jin -
ReplyDeleteWhat size did you cut these at?
In MTC, I imported at 72dpi and checked Use Actual. :-)
ReplyDeleteI bought both sets and I love them accept the 3rd to last one in the threaded file I cannot figure out how the little tabs work? They just don't fold outward like your photo I can't figure out what I'm doing wrong?
ReplyDeleteThanks Jin! I just cut my first of five rosettes but I'm having issues with the threading, the floss I'm using is ripping the holes apart, any suggestions or tips on how to not rip the holes apart?
ReplyDeleteHi Jin:
ReplyDeleteI am loving this set, but having trouble with some of the cuts. It seems for some of them, there aren't enough holes to make them gather properly once they are folded.
For example, when I cut out and fold numbers 6,8, 12, and 15 (I haven't checked them all), the holes sit very oddly once threaded--the fold bisects the hole and it is impossible to gather correctly. I'm having the same trouble with both the cuts in the Threaded Rosettes extra.
Would you please check this out or tell me what I'm doing wrong? I want to full my Easter baskets full of these pretty flowers and would like as many different combos as I can get.
Thanks so much!
Laura Poole
Hey Laura, I'm out of town but will be back next week. I'll check the cuts for you when I get back. :-)
ReplyDeleteHope you have a great time, Jin. No hurry. Since you did the Rosettes extra and yours turned out so nice, maybe all I'd need is the insight on what you did with those. Yours came out perfectly.
ReplyDeleteSafe travels!