This page may contain affiliate links. If you click and make a purchase through these links, I may earn a small commission at no additional cost to you. Click here to see my full disclosure policy.

Wednesday, March 31, 2010

Crop Chocolate.com


So a few weeks ago, Crop Chocolate sent out a call for Chocolatiers designers. They needed help with designing some items using the products that they offer on their website. Many who responded were chosen and I was lucky to be one of them.

I received my free package recently and these are the contents in the box:


All the items are by Memory Makers. The Spring Fling theme with all the pastel colors is actually really pretty. I have never used the adhesive-backed fabric ribbons before so that was really interesting to me. So far, I have made three cards with these and I am still working on the rest. 

If you are not familiar with Crop Chocolate, you can check out their website at https://cropchocolate.com/ They offer one product at a time at a discounted price. The item can be anything from papers, and albums to storage units. One of my favorite items that I bought from them is the MM Embellishment Center. Do visit the website to take a look but be warned that buying from CropChocolate.com is fun BUT it is also easy to get hooked. ;-)



Monday, March 29, 2010

Are We On?


I met R. when our kids went to the same preschool. When the little ones went on to different schools to attend kindergarten, we decided to meet at my home every Friday so that the kids still get to play together. We kept pretty much to that schedule until the holiday season when we were both too busy. They stopped coming for a while and then one day R called. We decided that we could meet on the friday 2 weeks after.


When friday came, she did not show. Apparently I had written down the play date on my calendar and Little Miss Scatterbrain didn't. She had completely forgotten about coming over. After whining about how forgetful she is, she told me that I should have sent her an email reminder on the Wed before. A simple "Are We On?" note would work. We laughed and managed to reschedule our get-together for the week after.

Then Summer came and Summer went and our kids went on to 1st Grade. With no more 4-day school for us, it was too challenging to meet up regularly. We have not had a play date since last September and then 2 weeks ago R called. We talked then realized that the kids can  have a play date this friday as it was a Teacher's Work Day and there are no classes. So, just in case she forgets again, I made R this card. I am going to put it in the mail on Tuesday so she will receive it on Wed. I wish I could be there when she tears open the envelope to see her chuckle. 

Cartridges used are Don Juan and Forever Young. The black layers are embossed with Cuttlebug's Swiss Dots folder while the card front was embossed with Sizzix's Three Dots Textured Impressions Embossing Folder.


Sunday, March 28, 2010

It's the Egg Thief!


Looking at the handbook for the Once Upon A Princess cartridge, I noticed this chick on page 63 and thought it'll be fun to use it for an Easter card:


For this 5.5" x 4.25" card, I cut the chick at 3 1/2 " on yellow paper and applied yellow flock to it. The basket (2") is from Stretch Your Imagination while the Easter eggs (1/2") are from the Easter cart. The paper is from DCWV's Flower Shower Stack that I recently bought from Joann's.
The greeting was printed using MS Word with Lettering Delight's LD Modern Sans font. I cut the oval using Tags, Bags, Boxes and More. Stickles was then applied to it.


Wednesday, March 24, 2010

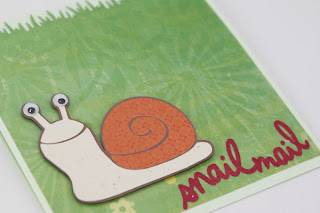
Snail mail...


Today's card was made using Lettering Delights' DB Forest Friends font. The snail was cut using MTC. The shadow layer was made using the Shadow Layer tool with a shadow width of 0.0400".


The "snailmail" wording is from the Cricut Wild Card cartridge while the border was made with the Martha Stewart Grass Edge Border punch. 


Saturday, March 20, 2010

A tip, a card, and a free download


Here's a tip for new Design Studio Users:
When making a card, go backwards. Instead of starting by cutting the main image out with a size that you think will work, start by setting the perimeters of the card by laying a rectangle on the DS mat. You can find a rectangle in several cartridges including Plantin Schoolbook, George and Basic Shapes, and Don Juan.


For example, a typical quarter-fold card measures 4.25" by 5.5". Just input the width and length(height) in the shape properties box so that the finished card will be within that size.


Doing so not only ensure that your Cricut cutout sizes will work for that card size, you will also know that any layers will fit in the embossing folders should you want to emboss since most embossing folders that are sold in the market now are made in that quarter-fold size.


I find that it also helps to cut down on paper wastage when I preset the size as I know that I will not end up with a card that is too big or too small than I had intended.


For this card I used the butterfly image from the Hello Kitty Greetings cartridge. It is cut at 3". I made the green layer by welding the shadow of the butterfly with a rounded-corner rectangle (George and basic shapes). The card base was made by welding 2 rounded-corner rectangles.


By presetting the size, I know with certainty that embossing that green layer will be easy as it will fit in the Sizzix embossing folder. Also, I enjoy making cards more than envelopes and I usually buy the pre-made quarter fold envelopes (no. 5 1/2). Since I have started by determining the card's finished size, I have no doubt that it will fit in the envelope. :-)

To download the cut file, click on this link:


The cut file contains the butterfly, the first layer, and the card base. 

Enjoy!


Wednesday, March 17, 2010

Tutorial: Non-Standard Shaped Cards

Tired of the same old square or rectangle shaped cards? I was too and so I came up with this idea using MTC to make my cards shaped just a little different.

Today's tutorial came about because of Sally. She asked:


The idea really is quite simple: Take a shadow layer, weld it with a square or rectangle to form the card front. Then, weld the whole thing with a mirror of itself or with another square (for a square card) or rectangle to make the card base. I used MTC for the following examples but you can easily use CDS if the cartridge already includes the shadow layer.

Example 1: Shamrock Card


I cut/import the shamrock at 4 1/2 " and made a shadow layer with MTC. Then I welded this shadow with a rounded rectangle to make the black layer. After that, I made a shadow of that black layer. The card base is made by welding 2 copies of that shadow of the black layer AFTER flipping the left-hand side image.


(please click on image to enlarge it)

To avoid any copyright conflicts with ProvoCraft, I have removed the shamrock image from the file. If you have the Paper Doll Dress Up cartridge, you can find the image there. Just cut it at 4 1/2 " to fit the card base.


Example 2: Frog and Toadstools card


The card base of this card is just a variation of that of the shamrock card. Instead of welding 2 shadows together, I welded one side with a rectangle that is twice the width of the card front.

(please click on image to enlarge it)


For cartridges that contain the image and its shadow layer, I use Design Studio to make the card base. However, most images do not come with the shadow layer and I would have to depend on MTC to make that.

This is a versatile method to get away from the usual rectangle-shaped card. I used the same method for my jumbo princess cards and the Easter lambies. Even if you do not have MTC or SCAL, you can still make these "sculpted" cards in CDS provided that the cartridge already contains the shadow layers of the images.


Happy St. Patrick's Day!


I was asked by a reader how I made the card base for the frog and toadstool card. I thought it would be easiest to answer that by making a separate post about it. Thus I had prepared a tutorial on how I make my non-standard (i.e. not rectangular) shaped card fronts with MTC. Then MTC version 2.2.0 was released yesterday and I just had to explore the new features. I know that I've been writing a lot about MTC lately but I really like this latest release. I think that the update that stood out the most is the CDS Backup function. It makes it just that much easier to make my "sculpted" card fronts. I went ahead and re-did the tutorial in the new version of MTC but I need to clean it up a bit and I will post it later today. 

Until then, let me share with you the card that I made for the tutorial.


The shamrock is from the Paper Doll Dress Up cartridge. I cut it at 4 1/2 inches and ran it through my Sizzix Texture Boutique with the swirls embossing folder. PearlEx in Brilliant Gold was then applied to highlight the texture. The black layer was made with MTC and embossed with the ever popular dots folder. The greeting was printed using MS Word with a free Celtic font that I found on this site:


Monday, March 15, 2010

Finally...Lettering Delights $1 Sale


I've been waiting for this sale since I bought MTC back in Dec. If you have MTC or SCAL, you might want to take a look at Lettering Delights' $1sale.

 While some of their offerings are similar to what scrapsNfonts currently have on sale, both do offer some fonts that are unique to their sites.

Btw, coupon code: InLuck is good for an additional 20% off a $25 purchase.


Saturday, March 13, 2010

3 Toadstools and a frog


 I finally had a chance to work on a card today. The images used are not from any Cricut cartridges. Remember the scrapNfonts $1 sale? The frog and toadstools are from the DB Forest Friends font that I mentioned in my previous post.


The sentiment was printed using MS Word. I used the SNFInfinity font that I also bought for a buck. I really like this font a lot and I'm pretty sure that it's one that I will use often.


I used MTC to cut out all images as well as the tri-fold card. Chalk was applied to the card front.


 I hope that you also had a chance to be  creative today.
Enjoy the rest of the weekend! :-)


Thursday, March 11, 2010

scrapNfont $1 Sale and MTC v2.0.3 beta


If you use MTC or SCAL, you might want to take advantage of scrapNfonts' $1 sale that is currently going on. Since buying MTC last dec, I have been patiently waiting for a $1sale from scrapNfonts or Lettering Delights. It's a great time to get their doodlebats and use them with the Cricut.


Use coupon code: DollarSavings for 20% off for any $25+ purchase. Expires 3/17.


I bought several files from this sale and one of my must-haves is the DB Forest Friends font. As soon as I bought it, I opened the .ttf file in MTC and did this with the turtle image:

Using MTC to create a shadow layer was a breeze:

 and since I was just playing around, why not a pink turtle? :-P


These are a few images from the font:


For a buck, I thought  it was quite a steal. I can't wait till the weekend comes so that I can spend some time playing with these.

 Speaking of MTC, version 2.0.3 BETA has been released. If you are interested in playing/testing this, you can find out more on the MTC forum:


By the way, I am not affiliated with any of the companies mentioned above. :-)

Monday, March 8, 2010

Spring Bunnies


Here's a card that's super cute and super easy to make.
I used the Easter Seasonal cart (again!) for the flowers and the bunnies. The "Spring" came from Stretch Your Imagination.

Flocking was applied to the bunnies for more dimension and Stickles were used to highlight the flowers.

The grass was cut using Martha Stewart's Grass Border Punch.


Wednesday, March 3, 2010

My Easter Baby Chick Card- A Design Studio How-To

So after posting my chick card yesterday, I received several queries on how to make that DS layout so I thought I would post my method here.


I was playing around in DS and first started by preparing the layout on one page like this:

   (Click on image to enlarge it)


Then I copied and pasted each individual element on their own pages like this:

  (Click on image to enlarge it)


until the last page where I just put in a rounded-corner rectangle from the George and Basic Shapes cart.

  (Click on image to enlarge it)


Go to each page and right-click on the mat to set the preview color. So for the "Happy Easter", I changed the preview color to pink, and that of the Chick to be yellow, and so on.


Lastly, click on the preview button


to see this:

Ta-da! 


 (Click on image to enlarge it)


That's all there is to it! :-)


Edit to add: Come to think of it, it might be a better idea to start with the rectangle FIRST and then continue with the main image (chick) and so on. That rectangle would set the perimeters of the whole project. Like if you want your finished card to measure 4.25" x 5.5", just start with a rectangle that size on the mat and work from there. ;-)

Tuesday, March 2, 2010

Greetings from a Baby Chick

 Click on the image to enlarge it.

This is a card that I first prepared on Design Studio. The chick, grass, eggs, and greeting are from the Easter Seasonal cartridge while the sign is from SongBird. I did apply flocking to the chick.


 I think I took a longer time selecting the actual patterned/colored cardstock than I did making the DS file. My limited drawing skills also messed up the sign post. I tried drawing in some wood grain with those squiggly lines but no one I showed the card to could tell what those lines were for. Grrrr. 

Oh well, guess I'd better stick to cutting.

 Click on the image to enlarge it.