

The kids came home from school on Thursday and found a box on the table.

"What's in it?" Twin A asked.
"I dunno." answered her sister.
Panda Girl piped in, "Why don't you open it?"

"Oooh..."

**collective gasp**

"Mine!" shouted Twin A.

"No, MINE!" insisted Twin B.

"MOMMY!!" Panda Girl hollered.
I came running to the room only to hear all three girls yelling...

"CAN I HAVE IT?!"

LOL! Lucky for them, I didn't make just one. :-) I was feeling pretty smug that I had made extras. I brought out the other two boxes and waited to hear the big "YAY!!".
But there was no "YAY!!".
Instead I hear a little voice ask...

"Mom, can I have the one with the ribbon?
Urgh......

Letter Stationery Set designed with Nancy Kubo's Mommy and Me graphics collection available at Lettering Delights.
Gift box designed by Jin Yong.
-------------------- Tips and Hints on how to make the Letter Stationery Set --------------------
The entire Letter Stationery Set was designed in Silhouette Studio. Since all of the art used for this project are graphics and not SVGs, you can make this with the regular (free) Silhouette Studio program that comes with your Silhouette cutter. You do not need Silhouette Studio Designer Edition for this project.
Here are some tips and screenshots in case you want to make your own letter set:
1. The Letter
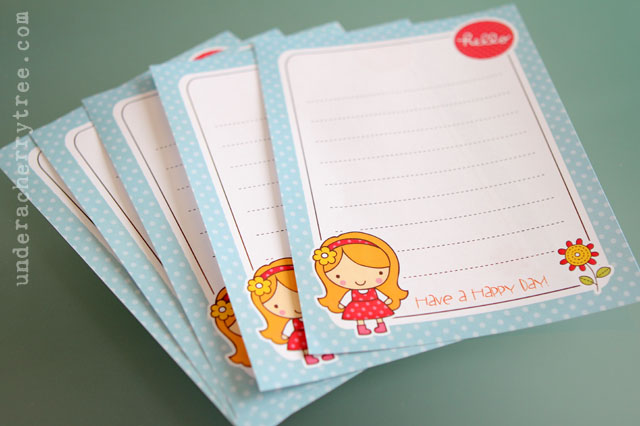

Each sheet measures 5" x 7".
LD files used are:
Mommy & Me Paper
Growing Up graphic set (girl, flower)
Mommy & Me Icons graphic set (hello)
LDJ Jillegible Font
To make, start with a 5" x 7" rectangle and fill with a patterned paper. Next, draw two rounded-corner rectangles and fill with white color. Add writing lines and change the Line Style. Embellish with graphics. Two sheets of "letters" can fit and print on one 8.5" x 11" paper. I manually cut these out with my paper trimmer.
2. The Envelope


Each envelope was designed to fit one folded sheet of letter paper or a 3.5" x 5" note.
LD files used are:
LD Envelope B svg set
Mommy & Me Paper
Growing Up graphic set (girl, flower)
Mommy & Me Icons graphic set (hello)
LDJ Jillegible Font
To make, first import File #7 from the Envelope B SVG set and reduce the size by 18% (or to 92% of its original size, or 7.22" x 10.255"). Fill with patterned paper.
Draw rounded-corner rectangles for the labels and embellish with graphics. Add in a square (filled with white color) for the postage stamp.
I printed the envelopes and handcut (with scissors!) since there wasn't enough room to add registration marks for print-and-cut.
3. The Stickers


The LD files used to make these stickers can be found in the Mommy & Me graphic collection that is available on the Lettering Delights store.
I used print-and-cut to make these stickers with the Silhouette Cameo. For more info on making stickers with the Silhouette Studio program, please click HERE.

4. The Box

For your free box download, please click HERE.
What a cute cute story! I love your letter stationery set,Jen! It's adorable! Oh,can I have the one with the ribbon on it too...LOL So funny! Do you have a tutorial and svg for the box? Thanks for sharing your Fabulous creation. Happy Crafting!
ReplyDeleteMisty
http://cardsbygeyda.blogspot.com/
Hi Misty, I'll be putting the cutting file for the box as a free download as soon as I finish cleaning it up. Stay tuned.
Delete:)Jin
Thank you so much for this WONDERFUL tutorial! I can't wait to buy the super cute graphics set. Is there a box tutorial/what SVG you used? Thanks so much!
ReplyDeleteHi Jessica! I designed the box and I'll be putting the cutting file as a free download as soon as I finish cleaning it up. Stay tuned.
Delete:)Jin
This comment has been removed by the author.
ReplyDeleteAbsolutely adorable, as usual! I love your attention to detail, right down to the wrappers around the stationery! Did you make the boxes too? You have three very lucky little girls!
ReplyDeleteHi Vicki! I did design the box and I'll be putting it up as a freebie soon. :)
DeleteYour daughter's are so cute!!! This stationery set is adorable!!! I would have had to fight with my sister for it!!! Since I'm younger, I would have lost!!!
ReplyDeleteI always lost back then!!
I don't have a Silhouette Cameo, just a Cricut with MTC(and the plugin). Can I make this on MTC?
What did you use for the box? Did you make the box, too?
You are sooooo creative!!! Thanks for sharing!!!!
Hi Karen, You will need a machine that can print-and-cut in order to make the stickers. I don't think that the Cricut can do this. Sorry. :(
DeleteHi Jin, l♥ve these. We are off today, and I think I will be doing this for my daughter. I was just wondering on how you did the sticker sheet. I looked at your tutorial. Should I kiss cut first the images and then cut out the rectangles on a higher setting? Thank you once again for sharing with us your creations. You inspire me each day :)
ReplyDeleteYes. If you are using the Cameo, kiss cut the internal images at Blade 1, Speed 10, Thickness 18. DO NOT unload the mat when the cutting is done. Instead, change the blade to 3, and set the rectangles to cut at Speed 3, Thickness 33.
DeleteThank you Jin, I am almost done, will share it with you later♥
DeleteSo cute! My daughter would love this and she wouldn't have to fight with anyone for it since her 3 brothers wouldn't be interested! Too funny about the ribbon, funny how kids notice stuff like that!
ReplyDeleteThank you! :) The girls crack me up and inspire me everyday. :D
DeleteOh man....you out did yourself again...and I love it!! There is no way we can ever get the Best Mommy Award now! heehee!!
ReplyDeleteThanks for sharing your awesomeness with us!
Big Hugs! Kathy
Thanks, Kathy! You always put a smile on my face with your witty comments. Love you!
Delete:) Jin
sure. . . I had talked myself out of these new sets and now you go and show us this:-) Love it Jin!!
ReplyDeleteThank you! :)
DeleteI am considering purchasing this bundle but I wanted to make sure that the bundle contained the blue polka dot paper and I can't see it. Was it from another paper pack or I am just completely missing it? This post is absolutely adorable!
ReplyDeleteHi Alicia, the blue polka dot paper is in the Mommy & Me paper pack. It's the blue sheet that has the LOVE and rainbow design on the left. I scaled the pattern so that only the blue dots show. To see how I did that, please check out the video tutorial HERE
DeleteI just bought this bundle, it is so adorable! My daughter asked me to make some cards for her too. Thanks Jin!
ReplyDeleteAha! Thank you, Jin!
ReplyDeleteI am in LOVE with this work! I've read your entry sooo many times today. I would love to do this for my daughters and their friends but cutting the envelopes by hand seems like a daunting task!!!! Thanks for sharing!
ReplyDeleteActually I only cut the curved part and the short diagonals by hand. I used my paper trimmer to cut the straight edges. Oh, and I cut 3 sheets at a time with the paper trimmer too. :)
DeleteLove this! I'm trying to make them, how do you make the writing lines as a dotted line?
ReplyDeleteJust select the lines and change them to dotted lines in the Line Style window. :)
DeleteThank you! Now it's so easy! One more question...........how do I space the lines evenly on both pages?
Deleteso I'm understanding this correctly, you do your text button and make the lines then highlight them and go over to the line style window and select the one you want? I tried and I keep getting like double lines. I know I'm doing something wrong.
DeleteThis is just adorable! Makes me wish my DGD's were still a little younger! They are too old for these graphics but this is such a great idea!! Thank you for sharing all your creativity! I have learned a lot from your tutorials.
ReplyDeleteThanks, Irlincks! :-)
DeleteI can see why they all wanted a set, ribbon or not. Thanks for the box download.
ReplyDeleteWhaaaaat!!!! I LOVE this!!!! I'm going to make a Christmas set. Wll link back to your blog when I post it! BRILLIANT idea! Www.happylifecraftywife.com
ReplyDeleteLove this, Jin. What great little Christmas gifts this would make for the little girls on my list! Thank you!
ReplyDeleteHi Jin.
ReplyDeleteSuch a brilliant idea of yours that i would like to share with my daughter..unfortunately i don't how to download it for the free box. i've already purchased the mommy&me graphic set. i managed to do the birthday card just like u did but now,i have problem to understand some computer terms(hehe..) which is 'unzip'..(i'm using a mac so i couldnt find the unzip words...) pls help me. TQ
Hey Sarah, send me an email to jin@underacherrytree.com and I'll email the free box svg to you.
DeleteJin...the cutest projects, honestly you are so inspiring, and I love your family stories, your kids are adorable!!
ReplyDeleteThanks, Liz! :-)
DeleteI instantly fell in <3 with this when I seen it! You completely AMAZE me and I'm so grateful that you share with us.
ReplyDeleteHow did you get the white border around the images?
ReplyDeleteThe envelope template doesn't exist any more, so can you recommend another one??
ReplyDeleteIf you go to Lettering Delights website go to the search and type in envelope B. It will say No products found, but underneath it says click here to view related ideas and help. Click that and it has a post from Jin. Click the more button and it has the envelopes to purchase there. That's how I got them.
ReplyDelete