

If you are just joining us in this series, you have missed the following chapters:
Today I will show you
I have left this topic to the end of the Beginner's Tutorial Series because using the Lettering Delights' graphics in Make-the-Cut can be a little tricky sometimes. As I have mentioned in this tutorial, the easiest type of graphic to trace are those that have little details. Solid, and bold designs will trace a lot easier than those that look textured or hand-sketched. In today's tutorial I will show you how to use the Pixel Trace tool in Make-the-Cut to bring an image onto the program's cutting mat so that you can cut out with the Cricut.
Because this tutorial is tailored for the beginner MTC user, I have selected 2 LD sets that can be easily traced. With practice, I am sure that you will be able to use the Pixel Trace tool more effectively.
An image is made up of many dots (or pixels). To Pixel Trace basically means, to connect those dots, thus forming a path and making an outline for the image. The darker the dots, the easier it is to trace. The LD Pun Intended set contains one of the easiest LD graphic to trace into MTC. To demonstrate the Pixel Trace tool, I will show you how the elephant image can be easily traced into MTC.


1. In MTC, click on the Pixel Trace button. Locate your graphic and click Open.


2. Click on the Import button to bring the image into the mat.

3. This image is easy to trace because it does not have much details at all. When you are pixel-tracing, the idea is to bring in all the necessary layers so that you can cut and assemble. In this case, the tool managed to easily trace the outline of the elephant as well as the outline of the elephant's ear.
4. Resize the image by reducing the Width (W) or Height (H) but make sure to keep the Aspect Ratio locked.

4. Resize the image by reducing the Width (W) or Height (H) but make sure to keep the Aspect Ratio locked.
5. Use the Ctrl+L to create the layers of the elephant.


In this next example, I will show you how to trace a graphic that is slightly more difficult to trace. I am using the bird from the LD Inch by Inch graphic set.

Ideally all the layers of the graphic should be traced in a single trace but sometimes it takes more than one trace to find all the layers.
1. Once again, click on the Pixel Trace button, locate your graphic, and click Open.


2. The outline on the preview box shows what was traced. The Threshold has to be adjusted until the outline of the desired layer is shown in the preview box.

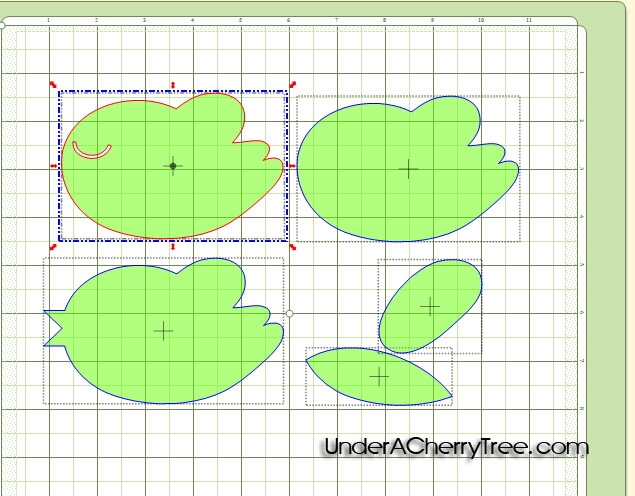
3. The threshold always starts at 127. Adjust it by increasing (or decreasing) in multiples of 5 or 10 and click Apply Changes. For this bird, I had adjusted the threshold in increment of 10 until I reached 230. I adjusted downward from there and found that I could bring in the first layer at a threshold of 225. I clicked Import to bring the first layer onto the mat.

4. The second layer was brought in at a threshold of 226 while the third was found at 227.


5. At this point you have all the layers that you need to cut and assemble the bird. You can resize the bird the same way as you did the elephant in Step 4 above. If you like, you may even go one step further and modify the layers to your preference.
I am not a fan of small tiny layers and I try to modify the layers by following the style of the Create-A-Critter cartridge. In this case, I am going to join the "eye" layer into the body and add an extra black body layer under it so that the eye shows.
7. To do that, I make a copy of the body by using Ctrl+C, and Ctrl+Shift+V to paste-in-place. I set one copy aside.

8.Next move the eye and wings layer over the other body layer. Align both layers by using Right-Click, Align and Space, Align, Horiz. Center.

I use Ctrl-B to separate the wings from the eye.

9.Next, I select the body and the eye only and use Ctrl-J to join them into one layer. Now I have all the layers that I want.


Here's a video for you:
Personally, I like to use Adobe Photoshop to separate the layers of a graphic before tracing in MTC. If you have Adobe Photoshop or Adobe Photoshop Elements, you might want to refer to this tutorial to see how I use the program to separate the layers and prepare the graphic for tracing in MTC. This is the video I made for that tutorial:
It's the end of the week and I hope that you have all enjoyed my LD-MTC for Beginners Series. Make-the-Cut is such an awesome program with so many wonderful tools that it is impossible for me to cover all the features of the program in a week. I barely even scratch the surface with this week's tutorial! I decided not to show on the blog the rhinestone tool, the lattice effect, wrap to path and of course, Print-and-Cut, because in my opinion, they are topics that are more appropriate for the intermediate and advanced user.
Due to the length of today's tutorial, I did not managed to show you the steps to make the elephant and bird cards. The tools that I used to make them are already shown in this week's tutorials. If you have followed them, there should be no problem for you to make these cards without the step-by-step instructions.

Due to the length of today's tutorial, I did not managed to show you the steps to make the elephant and bird cards. The tools that I used to make them are already shown in this week's tutorials. If you have followed them, there should be no problem for you to make these cards without the step-by-step instructions.

I hope that with this mini-series I have answered Anna's questions and also any others that have been posted by the new users of MTC. If I have helped you with these tutorials please let me know or even better, if you have made a card using my tutorials, do post in my Under A Cherry Tree facebook page. I would love to see what you made. Also, if you have any ideas on what I should demonstrate in my future MTC tutorials, please let me know by leaving a comment below.
Thanks, everyone! Have a SUPER weekend!
Jin,
ReplyDeleteAnother great tutorial with easy to follow information and instructions.
Please do not let these be your last, you have a wonderful talent for teaching.
I know for myself the other intermediate and advanced lessons would be greatly appreciated and well received. All of us are continuously (sp)learning something new everyday, "Old Dogs Can Be Taught new Tricks."
Thanks Linda
Jin, This series has been wonderful. Thank you so much for taking the time to share with us. I too hope that you will continue to make videos. There is so much to this program and you are a wonderful teacher!!!
ReplyDeleteJin, what great, easy to follow tutorials. I have had MTC for over a year now, and starting with the first tutorial, I have learned something new every time. I hope these tutorials continue and want to THANK YOU again for being so generous with your time and knowledge.
ReplyDeleteBarbara
Love your tuts, they are very clear and concise. Keep them coming, I refer people to your site a lot.
ReplyDeleteI don't have a lot of experience importing graphics so this was a big help. I didn't know about changing the threshold to create all of the layers! Thank you so much for taking the time to do these tutorials! Please do more with some of the intermediate features. Your teaching style is very clear, detailed and helpful!
ReplyDeleteCindy:)
wonderful set of tutorials! Thanks a lot, Jin. I look forward to more, esp Print and cut. Thanks...
ReplyDeleteIt's a steep leaning curve for me as I need to find the files and tutorials on the computer first of all... lol and then only can I start learning. phew
ReplyDeleteThanks. I enjoyed looking at the 5 tutorials and hope to practice what you taught here soon
Not being computer savvy, your tutorials have helped me out a lot with MTC....not so hesitant to use it. Thanks, Jin, for your big heart of giving!! Bless ya~
ReplyDeleteJin, your tutorials are great and so easy to follow, thank you for them. My second grader loves going into your gallery for ideas as well. I made her the penguin card last night and she loves it. I hope you will continue to have tutorials on your site because they are truly helpful, fun to watch, and learn from.
ReplyDelete