

I've been wanting to try out the in-lay die-cut technique for a while now but I never found the right image to do it. Until now.

When I first saw the new LD Big Bad Dad cut its, I was drawn towards the cassette tape svg. However, I did not like how the layers stack up so I started rearranging the cutting lines. No matter what I did, I kept ending up with a bulky card because there were too many layers that made up the tape reels. Just when I was about to give up and surrender to the original cutting file, it dawned upon me that I could in-lay the cut-outs!

Basically the in-lay die-cut technique (or in-laid die-cut technique) calls for the cut-outs to be placed back into the negative space, and thus resulting in a one-layer image. In other words, instead of piecing the layers together by stacking them up, the cut-outs are put together like a jigsaw puzzle. I don't know who came up with this idea but whoever who did is quite the genius indeed. This method of "layering"reduces the bulk that accompanies a multi-layer image and is a great alternative to stacking the layers together.
In order to in-lay the parts that made up the cassette tape, I had to make several modifications to the file.

First I made a card base from the original base layer of the image and I made a "window" from the top layer of the cassette tape. The above picture shows all the layers of the modified cutting file.
 |
| "In-laying" in progress. |
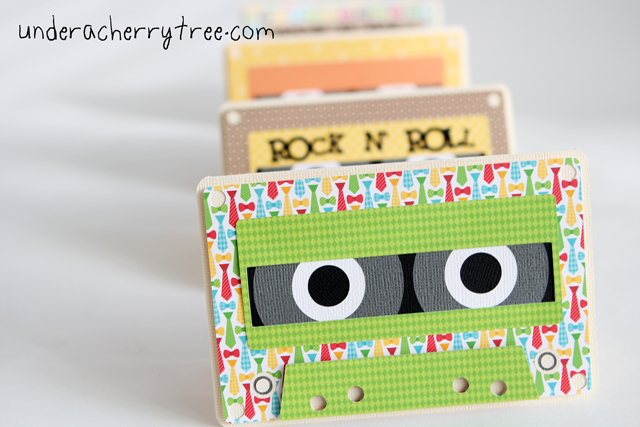
Here are some of the cassette tape cards that I made with the in-lay method.


Even though the Big Bad Dad cut its was intended for Father's Day cards and projects, I realize that I could use this cassette tape card for any other occasion. I even made a couple of "unlabeled tapes" to use for later. I will add the sentiment on the card front as and when I need it.

After having made a bunch of these "in-lay cards", I must say that I love this technique. A lot. I'm definitely going to use this method of layering more often.
Have you ever used the in-lay die-cut technique before? Did you use it with an LD file? If so, which one did you use? Do share as I'd love to know. :-)
---
File used:
Big Bad Dad cut its (svg included)
Another wonderfully explained tutorial Jin! I think what I like most about in-lay methods is the fact that it guides you where to glue so you'll always be guaranteed with the items being exactly where they need to go – not peeling it up before the glue dries!
ReplyDeleteThank you! I love seeing the pieces fit together so perfectly and with no gaps in between. It's like they were made for one another. Oh wait, they were. Haha! ;)
DeleteI have used this technique in the past, now that I am older and wiser, this is the point at which I do a print and cut!
ReplyDeleteLOL! I'm the reverse! I've done so much pnc, and now I'm in-laying!
DeleteI haven't physically made them yet, but have planned out some projects where I cut a shape such as a leafy vine or floral from 2 different papers, then inlay the negative from one into the positive ot the other. Two for one! I always try to look for ways to get use out of both the positive and negative of a cut, and the inlay concept is PERFECT for this.
ReplyDeleteOh, I love that you get two for one. Perfect! ;)
DeleteHey Jin! Someone posted a project using this method on the MTC forum and on the Silhouette blog (I think). I had never heard of (or seen) it and couldn't imagine how I would ever use it. But after seeing your explanation, I see this could indeed be used for so many things!! Thanks for another great tutorial.
ReplyDeleteIt's a fun technique and I'm definitely going to do more of these in-laying cards. I hope you try it out too, Mandy. :)
DeleteJin, the papers you used for the cassett which papers are they? are they from LD? like the multi colored ones with the "ties", and the yellow "hello sunshine" are they part of the :big bad dad cuts it?
ReplyDeleteThose are 6"x6" patterned papers. The multi-colored ones that I used for the 3 cards (including the ties and the green card) are from Doodlebug's Day to Day paper pack while the orange/yellow papers were from Lawn Fawn's Hello Sunshine. You can click HERE and HERE to see how the paper packs look like.
Delete