

If you are just joining us in this series, you have missed the following chapters:
Today I will show you
How to Weld, Join, and Center Align in MTC.
We are making a Thank You card and you will need:

If you do not already have the Delilah Tags SVG and LD Cursive font, just click here and here to add to your cart. Check out and follow the instructions to download to your computer.
Let's start:
1. Load LD Cursive font into Make-the-Cut. To learn how to do that, please look at Step 8a and 8b in this tutorial.
2. Click on the "Add a group of characters" button and type "Thanks".

Check the box next to "Auto-Split" and leave the box next to "Vertical" unchecked. Click on Add.
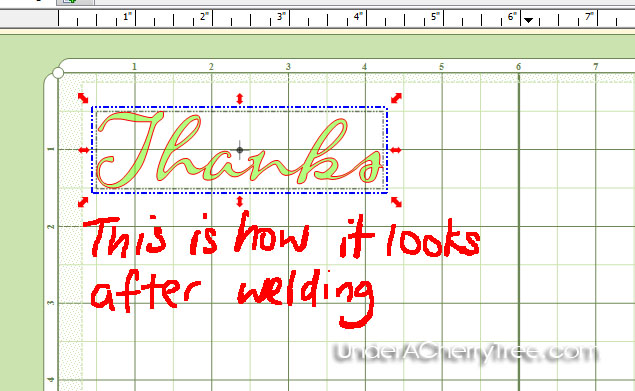
 3. Keeping the blue bounding box on the mat (it should enclose all the letters), press CTRL+W to weld. You may also do the same using your right mouse button and selecting Shape Magic, and Weld.
BEFORE:

AFTER:
.
4. With the Lock Aspect Ratio on, change the height (H) to 0.75" and press Enter (on your keyboard). The width (W) will adjust automatically.

5. Click somewhere on the mat to remove the blue bounding box and import delilah_tags-04.svg into MTC. To learn how to import an SVG, please look at Step 2 and 3 in this tutorial.


6. Reduce the size of the tag by changing the width (W) to 5".


7. Separate the two layers of the tag and bring the top layer over the "Thanks" word.

8. Select both the word and the oval layer: Moving your cursor to the top left corner of the 2 layers, hold down the left-mouse button and drag out a blue rectangle that is big enough to box in the oval and the word.

Right mouse click and select Align and Space, Align, Stack.

9. Now you can join the word and oval layer together by using Ctrl+J or right-mouse click, Shape Magic, Join.

10. Arrange all the layers in MTC, and load the papers and mat into the Cricut machine. Cut.


11. Adhere the top "Thanks" layer to the bottom fancy frame with foam tape and put together the card with tape.


If you like, you may embellish with rhinestones and a ribbon or twine. You may also add a decorative edge on the bottom with a border punch.

This is just an additional note about the welding done in Step 3: Because of the way the font looks, it seem like the letters are already joined when they really are not. If the letters are not welded together, the Cricut will cut out all the outline of each letter, leaving many little pieces of letters on the mat. On the other hand, when the letters are welded together, the Cricut will cut the letters (that are touching) as 1 piece.


Here is another video for you:
If you managed to follow in my tutorials and make a card, I would love to see it. Cindy has made a card using my Cupid Card Tutorial. You can take a look at it over at the Under A Cherry Tree Facebook page or over at Cindy's blog. Thanks for sharing your card, Cindy! :-)

We are making a Thank You card and you will need:

- 1 White cardstock for the card base, 5.5" x 8.5" folded into a 4.25" x 5.5" card
- 1 sheet of Colored/Patterned cardstock, 4" x 5.25" (or 4.25" x 5.25" if using border punch
- 2 small sheets of different colored/patterned cardstock (approx. 2.5" x 6")
- 1 piece of twine or ribbon
- tape and foam tape
- border punch (optional)
- rhinestones (optional)
- Delilah Tags SVG from Lettering Delights
- LD Cursive font from Lettering Delights.
If you do not already have the Delilah Tags SVG and LD Cursive font, just click here and here to add to your cart. Check out and follow the instructions to download to your computer.
Let's start:
1. Load LD Cursive font into Make-the-Cut. To learn how to do that, please look at Step 8a and 8b in this tutorial.
2. Click on the "Add a group of characters" button and type "Thanks".
Check the box next to "Auto-Split" and leave the box next to "Vertical" unchecked. Click on Add.
BEFORE:

AFTER:
.
4. With the Lock Aspect Ratio on, change the height (H) to 0.75" and press Enter (on your keyboard). The width (W) will adjust automatically.
5. Click somewhere on the mat to remove the blue bounding box and import delilah_tags-04.svg into MTC. To learn how to import an SVG, please look at Step 2 and 3 in this tutorial.

6. Reduce the size of the tag by changing the width (W) to 5".


7. Separate the two layers of the tag and bring the top layer over the "Thanks" word.

8. Select both the word and the oval layer: Moving your cursor to the top left corner of the 2 layers, hold down the left-mouse button and drag out a blue rectangle that is big enough to box in the oval and the word.
Right mouse click and select Align and Space, Align, Stack.
9. Now you can join the word and oval layer together by using Ctrl+J or right-mouse click, Shape Magic, Join.
10. Arrange all the layers in MTC, and load the papers and mat into the Cricut machine. Cut.


11. Adhere the top "Thanks" layer to the bottom fancy frame with foam tape and put together the card with tape.


If you like, you may embellish with rhinestones and a ribbon or twine. You may also add a decorative edge on the bottom with a border punch.

This is just an additional note about the welding done in Step 3: Because of the way the font looks, it seem like the letters are already joined when they really are not. If the letters are not welded together, the Cricut will cut out all the outline of each letter, leaving many little pieces of letters on the mat. On the other hand, when the letters are welded together, the Cricut will cut the letters (that are touching) as 1 piece.


Here is another video for you:
If you managed to follow in my tutorials and make a card, I would love to see it. Cindy has made a card using my Cupid Card Tutorial. You can take a look at it over at the Under A Cherry Tree Facebook page or over at Cindy's blog. Thanks for sharing your card, Cindy! :-)

Thank you Jin for checking out my card and mentioning it here! I was delighted you asked me to post on your facebook page! Your work really inspires me!
ReplyDeleteBTW I didn't know about the stack feature in MTC. I can't wait to try that out! Keep your tutorials coming! I know putting them together takes a lot of work. They are appreciated!
Cindy:)
I am trying to decide if I can master the MTC. I am not very computer literate.
ReplyDeleteI just wanted to thank you for all of your great videos. I am learning MTC just by playing around with it and watching your videos. I learn something new everytime I see one of your videos. Thanks for your time and for sharing with us.
ReplyDelete