This page may contain affiliate links. If you click and make a purchase through these links, I may earn a small commission at no additional cost to you. Click here to see my full disclosure policy.
It's Christmas Eve! Are you all set for the big day tomorrow? Whether you are all prepared for Christmas or still wrapping presents, please take a seat, grab a cup of tea and enjoy these gift tags that were made by the readers of this blog.
Ana Maria's tags are adorable! I love that she used the colors of the elf to coordinate with the base of the tag. You can read more about Ana Maria's tags on her blog Shorty Creations.
2. Cecilia
I was so impressed when I first saw Cecilia's tags on Facebook. What a clever idea to print and layer the main image on the base!
I really like the little touches that she added to the tags. Did you notice that she even varied the design of the labels too? There are more details of this project on Cecilia's Crafting in the Night blog. You must check it out!
3. Ooh La La Paperie
So you want to make these tags but you have a problem. You only have the SVG or Cut Its but you do not have the Silhouette Designer Edition that is needed to import the files. No worries! Ooh La La Paperie has come out with a BRILLIANT tutorial that will show you how to use your SVGs to make these tags WITHOUT the Silhouette Designer Edition!
Go to the Ooh La La Paperie blog and she will show you how to use the free Inkscape program to convert your SVG into a PNG file that you can use to print-and-cut these tags out. Even if you already have the graphic or the Designer Ed, do check out her tutorial. It's a good one and besides, you never know when this info will come in handy. ;-)
4. Candi
Candi is always full of great ideas and I have learned much from her. Her addition of glitter and glossy accents (for the eyes!) on these tags sure kicked them up a couple of notches.
Candi is also super smart to print out the patterned base instead of layering it like I did. At the time of this post, Candi has not updated her blog but she has mentioned that she will put up a post on these tags as well as some other 3D projects using Lettering Delights files soon. In the meantime, you can read about Candi's other work on her Creating in Chaos blog.
5. Rebecca
Becky is one of those girls who constantly amaze me. For example, she has only started blogging 6 months ago and already it is filled with a ton of lovely projects.
Even though she is very busy, Becky took the time to make these tags. I had used the Silhouette Studio software for my tutorial but Becky has shown that you can make this project with Make-the-Cut too! She used Make-the-Cut to make her tags with her Silhouette SD. You can see more photos and read about Becky's tags on her Happy Card Encouragement Factory blog.
***
I want to give my most heartfelt thanks to these ladies for taking the time to try out my tutorial. It is a super busy time of year and despite me giving only a very short notice, they created these beautiful tags to share with all of us. Please visit their blogs to check out their work and don't forget to give them some love.
I have also created this special button for your featured blogs so feel free to grab this badge, ladies! Just copy and paste the code to the sidebar of your blog. Thank you for sharing your work with us!
Thanks for all your comments and feedback regarding my Gift Tags tutorial. It is the end of the year and I am evaluating what I should do for this blog next year. Your feedback will help me decide what kind of tutorials to focus on so please keep those comments coming.
Speaking of gift tags, did you follow my tutorial to make some? If you did and would like to show off your work , just send me an email with a picture or two of your tags. If you have a blog, leave a comment below with a link to your blog post. Make sure that your post mention my tutorial so I know that your tags were inspired by it.
I plan on highlighting YOUR TAGS (and blogs) in a post this Saturday and I would appreciate it if you could send your pictures or comments by tomorrow, 9pm PST.
I've just added some additional info to the Gift Tag tutorial. I realize that I didn't include the instructions for making the green base for the gift tag. Sorry about that!
I *heart* the Seven Seas Collection! Did you know that LD didn't used to offer cuttable files? The Seven Seas graphic set was one of the first LD sets that I converted into a Cut file. It seems like yesterday when I was dreaming about using LD and MTC with my electronic cutter. Just see how far they have come in a year! Not only does LD offer cuttable files now, they have collaborated with MTC and with my favorite cartridge (Create-A-Critter) designer, Nancy Kubo, to bring us her awesome designs. I am sitting here cutting out a LD-Nancy Kubo SVG with Make-the-Cut and my Silhouette Cameo. It feels so UNREAL!!
I smile whenever LD highlights the Seven Seas Collection because it brings me back to the time when I would spend hours converting their graphics into cuttables. You are lucky that you do not have to spend time to do that because the Seven Seas are now available in SVG and Graphic formats. If you do not already own this set, grab it now. The SVG is 50% off (only $2.50!) while the rest of the collection (Graphic, Font, Paper, 2 Alphabets) are available at only $5 (reg $17)!
While you're at the LD site, don't forget to check out the new Nancy Happy Holiday sets.
Nancy's designs are so adorable I even used them to make a print-and-cut tutorial for you. If you have not seen it, just scroll down to my previous post or just CLICK HERE.
By now you would probably have seen the new Nancy Happy Holiday sets on the Lettering Delights website. I couldn't have been more happy when I saw the sets. Nancy Kubo is one of my favorite designers and her Create-A-Critter cartridge is the only reason why I still have my Cricut Expression in my house. Well, and that my kids wanted me to keep the cutter. Anyway.....with Nancy's designs now available on the Lettering Delights site, it really feels like it's a dream come true!! I'm not going to get all sappy about it but I'm really overjoyed that what I had once fantasized about has now become a reality.
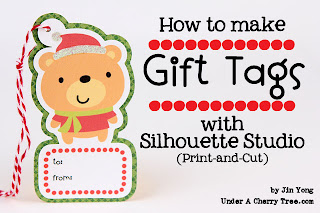
As the MTC plug-in for the Cameo was released when I was away on vacation, I really haven't had time to play with it yet. At the moment I am really liking the print-and-cut capability of the Silhouette Studio with the Silhouette Cameo and so for today's tutorial, that is exactly what I am going to use.
Here is the video tutorial and if you prefer the written instructions, just keep scrolling down. ;-)
1. Using the rectangle tool, draw a 2.5" x 4.5" rectangle.
2.
File>Merge and open the nan_01.png file if you are using the GRAPHIC set. Use the Nancys_Holidays-01.svg file if you are using the CUT IT set.
Lock the Aspect Ratio and set the width to 2".
Position the bear inside the rectangle.
3. Make a quick trace of the Bear by unchecking High Pass Filter and at 100% Threshold. If you are using the svg from the Cut It set, you can skip this step.
4. Draw a rounded-corner rectangle and set the size to 2" by 1.2"
5. Make a shadow layer of the rounded rectangle and the bear by using the Offset tool.
6. To remove the "hole" in the middle of the tag, just right-click and select Release Compound Path.
Select and delete away the "hole".
7. With the rounded-corner rectangle selected, click on the Rhinestones tool button.
Select Edge for the Rhinestone Effect and reduce the Rhinestone Spacing to 0.10mm.
8. Fill the rhinestone circles with red using the Fill Color tool.
9. Add text to the label using the LD Little Piggy font and at a font size of 14 pt.
10. Fill the letters with black....
..... and delete away the rectangle from Step 1.
11. To make a tab for the gift tag so that a ribbon or twine can string through, draw two circles. Place the smaller circle inside the larger.
12. Weld the larger circle to the gift tag.
13. Using the Line Color tool, change the line color of the gift tag and ribbon/twine hole to grey. Change all other outlines to transparent.
14. Open the Cut Style window and set all the cut lines to NO CUT except for the gift tag and the ribbon/twine hole.
15. Now the gift tag is ready for print-and-cut!
16. Maximize your cardstock by filling the page with the gift tags!
17. If you are using the SVG and prefer to cut out and layer the bear, just move the bear to outside the virtual mat so that it does not get printed.
Here is a tag that I made with the SVG:
These tags are really fun to make! Use the Nancy Happy Holiday set to make different designs to use as gift tags.
Christmas is but a few days away and I hope that today's tutorial will help when you run out of gift tags. Late at night. When all the stores are closed. :-P
IMPORTANT:
If you find this tutorial helpful, please click the LIKE button below or leave a comment. Your feedback helps me decide if I should continue posting these types of tutorials. Let me know if they are too simple or long-winded or if I should cut down on the details. Also, please let me know if it is necessary to have both written and video tutorials. Should I just post the video?
Thanks!
UPDATE: I just realize that I didn't include the instruction for making the larger green base.
To make it, just do an offset of the gift tag. Set the Offset distance to about 0.12". When cutting, "switch on" the cut lines for it and the twine/ribbon hole.


