

I was excited and nervous as I prepared to use my new Brother ScanNCut2 machine.
"The box was packed upside down. Is it broken?"
"Is it going to cut through the mat?"
"Am I going to mess up?"
I've used my Silhouette Cameo for a long time and I have gotten so used to it that I can't help feeling the newbie jitters. Cutting with this ScanNCut2 is, after all, the first time that I'll be using a Brother electronic cutter. I had only just received the machine the day before! (See the Unboxing HERE). Many folks have said that it's easy to use and yet somehow my inner voice was convinced that I was going to screw up.
The ScanNCut is basically an electronic cutting machine with a built-in scanner. I had done some research on the cutter when Brother introduced the first generation of the machines in 2013. At that time, I decided against buying one after noticing the mixed reviews. However, the feedback for the new model, the ScanNCut2 is generally pretty good and so I went ahead and bought myself one**.

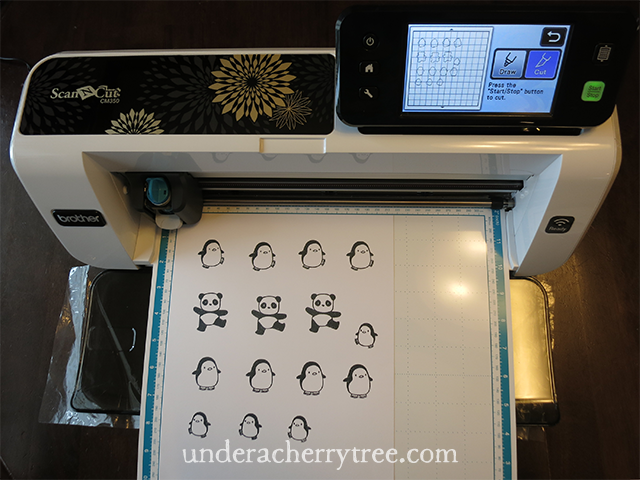
One of the reasons that I bought the ScanNCut2 machine was to cut out rubberstamped images. It is time consuming to fussy cut and costly to buy the matching metal dies. So for my first cuts, I planned to cut out some stamped impressions. I stamped on a sheet of Neenah cardstock, and placed that onto the cutting mat. Next, I took out the Operation Manual and started studying it. The instructions were clear and easy to follow.

With the Quick Reference Guide in hand, I confidently switched on the machine. I was ready to give it a go.
 |
| the default cut settings |
It is important to do a test cut on the paper to make sure that all the settings are right before going ahead to cut the actual project. The ScanNCut2 has made it very easy to do just that.

All I had to do was to choose the test shape (I picked the triangle)...

... and size (I used the default)...

....load the mat and...

... press a (green) Start/Stop button so that the machine will start to cut.

My first test cut did not fully cut through the paper. As recommended by the Operation Manual, I increased the blade depth by 0.5 (i.e. from 4 to somewhere between 4 and 5 since there are no markings on the blade holder for 4.5) and got the machine to make a second test cut. It was perfect! Now it's time to cut out the stamped images.
 |
| These are the stamped images that I'm trying to cut out. |
I loaded the paper and the mat into the machine and selected the Scan feature.

I followed the instructions on the touchscreen to start the scanning process.
 |
| The touchscreen is how I get the machine to scan and to cut. |
I noticed that the machine not only scanned the stamped images, it also captured the shapes of the two test cuts that I had previously made. I was glad that I was able to trim the scanned page down and exclude the two triangles.

One of my favorite feature of the ScanNCut2 is that it allows the user to set a margin (i.e. an offset) around the scanned images. The Outline Distance starts at 0.04" and goes up by increments of 0.04". Since I usually cut my stickers out with an offset of 0.07", I set the Outline Distance for these stamped images at 0.08"- it's the closest thing I can get to an offset of 0.07" with the ScanNCut2.

Here's one more look at the cut lines. I thought they looked fine and so I hit "Cut" on the touchscreen....

... and hit the green Start/Stop button to start the cutting process.
I held my breath while I waited for the machine to finish cutting. I was so excited! As soon as the ScanNCut2 finished doing its thing, I gently lifted a corner of the cardstock and saw....

... a perfect cut!

In fact, all my stamped images were cut out beautifully. I was so happy!!

The ScanNCut2 is surprisingly easy to use. I didn't need to hook it up to a computer or download any software to cut these images out. I just followed the instructions in the Operation Manual, and pressed a few buttons on the touchscreen. I'm so happy that I no longer need to fussy cut my rubberstamped images or spend money to buy the matching metal dies for my stamps. I can just use my new ScanNCut2 to literally, scan the images and cut them out. Yippee!!
These are only the first cuts that I have made with the machine and already, I am in awe. I *heart* this cutter! Besides being able to scan and cut out stamped images, the ScanNCut2 also have many other features that I have yet to explore. I cannot wait to try them out and share them here with y'all!
Stay tuned. I'll be back soon to tell y'all more.
---
** I am not affiliated with Brother Industries, Ltd. I paid and bought the ScanNCut2 with my own money and the reviews are a reflection of my personal experience with the machine.
p.s. If you missed the Unboxing of this machine, you can find my post HERE.
oh my gawsh! This sounds great. I miss my electronic cutter, but could not decide on which one to get.The scan and cut feature sounds great- especially for rubber stamped images! :D
ReplyDeleteOh, now I want one! So, this sounds a lot easier to use than the Cameo's PixScan? I have the PixScan mat but haven't even updated my software to use it yet!
ReplyDeleteJin,
ReplyDeleteDo you think this would scan and cut through lamination? I am a teacher and laminate everything. Would love to find something that would cut around images that I have laminated. Just wondering about the glare that lamination might create and if that would affect the way the machine reads the outline and also the weight/thickness of the lamination.
I'm not Jin, but my thought is if you cut through lamination (say cutting shapes out) you no longer have sealed edges and the layers would fall apart. But. . . perhaps I misunderstood your question.
DeleteI am now eager to order a Scan n Cut for myself. . . thanks Jin.
Great review... thorough for this one aspect of Scan N Cut 2.
ReplyDeleteI can see that I should have unsub'd from your blog a long time ago. You are such an enabler! And of course, you had to use a stamp set that I have as a perfect example as to why I NEED this machine! I love your product reviews. Thanks for sharing. Guess I know what I want for Christmas this year! Have a good day!
ReplyDeletePS I also wanted that big bear....but I didn't get it! lol
OH MY, this looks just too easy to be true!!. I have attempted to stamp and then manually cut out an image using a craft knife and wow, HAND CRAMP! I've been buying the stamps and dies for stamp sets and wow, it does get very expensive. Keep the postings coming, i'd love to see how this machine works out. Fortunately for me, Christmas is coming. =) Thanks Jin!
ReplyDeleteLove it! So can you use silhouette cuts on this machine? Or can you buy cuts and cut them out with this? Does it cut closer to the stamped images if you want it too? Thanks!
ReplyDeleteNice! It worked just as you'd hope! Thanks for sharing your great experiment with us all :D
ReplyDeleteCecelia
At least you read the manual...I just watched a 5 minute video and I was good to go!!! Lovin it!
ReplyDeleteThank you for this great pictorial review! This was exactly what I didn't need, lol. I too have been researching it since the original version (but only for about the last year or so). I was determined to get a ScanNCut for Christmas, and then they came out with this for even less money, woot! I would have bought it from HSN too, in fact I tried but I live in Canada and they wouldn't ship it to my Washington address just south of the border. Buggers! I'm contemplating ordering it from Walmart or Amazon instead, but that one comes with the rhinestone kit instead of the wireless activation card. As a paper crafter, I don't really see a need for the rhinestone kit but since I plan on cutting out my own svg files it would probably be really handy to go wireless. Anyhow, thanks again for the review, you made the jitters go away. :) Much better than any HSN video!!!
ReplyDeleteWill there be designs, or we can import designs? I know you used stamps and scanned (very cool) , but I'm curious how to get other designs into the machine.
ReplyDeleteJe suis ravie d'avoir lu votre expérience, elle arrive en France mi-novembre ! je voudrais savoir si elle est moins bruyante que la silhouette Caméo, son bruit me gêne trop et je ne m'en sers pas.
ReplyDeleteI am delighted to read your experience, she arrived in France in mid-November! I wonder if it is quieter than the cameo silhouette, its sound disturbs me too much and I do not use it. Nicky
Hi. Thanks for this review. Just bought a scan n cut 2 from spotlight last week and noticed that my machine's default outline distance starts at 1.00 instead of 0.04. This is a huge issue for me as i would like to start doing planner stickers. Would appreciate any advise. Thank you :)
ReplyDelete