This page may contain affiliate links. If you click and make a purchase through these links, I may earn a small commission at no additional cost to you. Click here to see my full disclosure policy.

Monday, January 28, 2019

Timber! I've fallen for you...


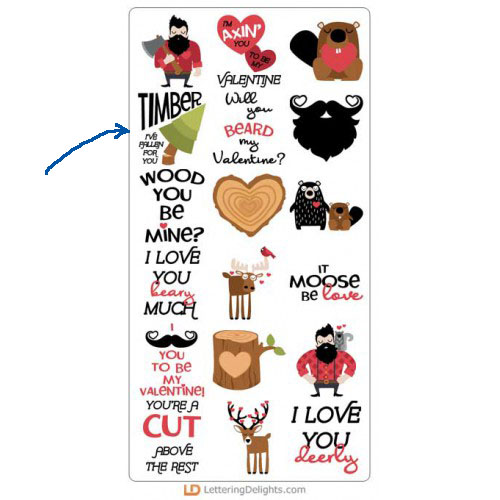
So I have an easy card idea to share but strictly speaking, it's not really my card design. You see, as I was browsing through LD's Channel the Flannel collection, I came across a preview that gave me an idea...

http://www.letteringdelights.com/cut-sets/cut-sets/channel-the-flannel-cs-p16655c5c12?tracking=d0754212611c22b8

See that cut file that I pointed out above? That alone can be its own card design!


Using Silhouette Studio (DS), I printed the sentiment and manually cut it out with a stitched square metal die. I cut the tree using my Silhouette Cameo and different colored cardstock and pieced them together with tape.


I like the clean and simple look of these cards but I really love how quickly they came together. I'm going to be busy with home and family stuff in the next couple of weeks and I could certainly use a fast project to get that crafting itch out of my system.


And speaking of busy, I gotta go....

Talk to you later!

----------
File used:
Channel the Flannel CS (SVG included)


Saturday, January 26, 2019

Wood you be mine?


Have you seen the new collection that LD released yesterday? "We Go Together" is so cute I think I might have squealed a little when I saw it!

http://www.letteringdelights.com/bundles/we-go-together-big-bundle-p16687c6?tracking=d0754212611c22b8http://www.letteringdelights.com/bundles/we-go-together-big-bundle-p16687c6?tracking=d0754212611c22b8


I adore the new designs and I cannot wait to play with them but today's post is not about them. I made these cards last week and didn't get around to putting them up on the blog and so here we go.


Of all the graphics that are in the "Channel the Flannel" collection, I think the one that stood out the most for me is the beaver. I mean, just look at that face. Isn't he a cutie?

Using Silhouette Studio DS, this is what I came up with:


I printed the card front and manually cut out with a rectangle metal die. The beaver was cut on different colored cardstock and pieced together with glue and foam tape.


Although I like the simple look of the card, I wondered if I could make the sentiment larger. After all, that is the point of the card, isn't it? To ask if he/she would be your Valentine?

So this is what I came up with:


Once again I printed out the card front and manually cut it out with a metal die while the beaver was cut and pieced together.

I have another card that I made from the Channel the Flannel collection to share with you but that'll have to wait until my next post.

Talk to you later!

-----
Files used:
Channel the Flannel CS (svg included)

Channel the Flannel Paper Pack


Thursday, January 17, 2019

You Melt My Heart

Our local Fred Meyer seems to be taking an especially long time to clear out their Christmas stock this year. While Target has already salvaged theirs for over a week, I still see Christmas up on the shelves at the grocery store last Friday.  When I went there again after the weekend, Christmas things were almost gone and have been replaced by Valentines. I was pleasantly surprised. I love Valentines!

As it turned out, I wasn't the only person who was not expecting to see Valentines in Fred Meyers that day. The cashier who was helping me with my transaction was dismayed when she rang up my chocolates.

"I can't believe that they are already putting out Valentines!", she exclaimed. And she looked embarrassed as she leaned in and whispered,

"My tree is still up!".


Well, ready or not, Valentine's Day is fast approaching. It's less than a month away! It's okay if your tree is also still up (Shh!...I won't tell!), it's time to get your Valentines started.


I used to have so much fun putting together tons of goodie bags for my girls' classmates for Valentine's Day. Now that the kids are older, they prefer making their own Valentines for their friends. This only means that I now have more time to make more Valentine's Day cards. Yippee!

For today's shaped card, I'm using the new Yeti in Love cut set that LD had just released last week. Applying my usual method of welding various rectangles to the different offsets, I ended up with this:


I was going to use print-and-cut on the whole entire card base but it ended up being too heavy on the card front. So I decided to cut the white card base using a heavier cardstock (110lb Recollections paper from Michaels) and only print-and-cut out the colored card front. Since a letter-size page can fit two of the card fronts, I printed out and cut out two copies so I can make two cards. (The illustration below does not indicate it but I did also cut out two sets of the Yeti and the card base so as to make two cards.)


Here are the finished cards:


If you have not see the latest LD releases, CLICK HERE to check out their Yeti for Love and Yeti to Party. While you are there, don't forget to grab the Yeti for Love- printable Valentines. It is this week's freebie.

http://www.letteringdelights.com/graphics/printables/yeti-for-love-valentines-pr-p16646c4c19?tracking=d0754212611c22b8


---
Files used:
Yeti for Love CS
Betty the Yeti paper pack


Tuesday, January 8, 2019

Jin's Sticky Note Holder for Personal Planners


Have you ever shopped at an online store forever and finally got to step inside its brick and mortar? I still remember the first time I saw a physical kikki. K store. We were on vacation in Singapore and were walking around the mall. I couldn't believe my eyes when I saw the kikki. K store. I didn't even know there was a store location in Singapore and my jaw dropped when I saw it. I was so excited! I half-ran into the store and stared in amazement. Walls of planners, refills, and all kinds of goodies that I had seen online and never thought I would get to touch in person.

Everything. Was. Beautiful!!

As I stood staring at all the stationery in wonderment, I noticed I wasn't alone. My girls were just as amazed as I was. We loved everything that we saw and we wanted it all. To Hubby's relieve, I didn't spend all of our vacation money in there but I did get the girls their first kikki. K planners...

https://www.instagram.com/p/BHGSmzGBEh-/

That was 2 years ago and since then we have been back to Singapore a few times. We always make sure to make a stop at the kikki. K store. In fact, we were there last month and not surprisingly, we couldn't leave without getting a new planner and some refills.


So imagine my delight when LD made a planner-themed collection as their first release of 2019! I knew immediately that I had to use the Calendar Animals to make something for my girls' planners.


I like to buy kawaii sticky notes for my kids but they are not very good at keeping them in one spot. I thought that adding a holder in their planners will help.


Using Silhouette Studio, I opened the frog SVG from the Calendar Animals Planner Divider cut set. Sadly, the image was too wide to fit properly inside the personal planner even after I tried reducing the image. I decided to use the Calendar Animals - Heads cut set instead.


From the kikki. K website, I found the exact size of their planner pages and used that as a guide when making my own planner divider. In this case, the refill page measures 6.81" x 3.78". I added some "punched holes" and estimated their position on the page. My intention was to use the planner hole punch that I had bought from Michaels instead of using my cutting machine. I thought the holes would look neater that way.


The steps to making the divider/sticky note holder is shown in the above screenshots. In a nutshell, I welded a copy of the animal head to some rectangles to form the base. After cutting the page out, I punched out the holes with my hole punch.


Here is the finished product. Isn't it the cutest? I started making the frog and ended up making the chick and the bear too.


I only used the Calendar Animals - Heads cut set in today's project but the whole entire Calendar Animal collection is on promotion this month.  CLICK HERE to find out how you can get the whole shebang for free!

http://www.letteringdelights.com/news/article?news_id=181&tracking=d0754212611c22b8

I hope you enjoyed today's project as much as I had fun making it. One more thing, if you have not downloaded this week's freebie, CLICK HERE to get your free printable calendar and week chart.

http://www.letteringdelights.com/graphics/printables/calendar-animals-pr-p16632c4c19?tracking=d0754212611c22b8

That's all for now. Happy cutting!


---
File used:
Calendar Animals - Heads - CS


Tuesday, January 1, 2019

Rebooting...

So here we are.

2019.

I was going to take a couple of weeks off from blogging but it turned into a couple of months and before I know it, the year is over. The realization that I haven't posted much here at all only hit me when I posted my 2018 Top 9 on Instagram (IG). While those pictures can be found under the IG tab here on the blog, none of them had made it into an actual blog post.

In an attempt to make up for lost time, I'm going to post all the crafty pictures that I posted on IG last year right here. For those of you who have seen them before, thanks for hanging out with me on IG. For the rest of you who are just seeing them for the first time, I hope you like them.

Happy New Year, everyone!!

What's the Buzz CS
Feeling Sheepish CS

K-Pop CS

K-Pop CS

Hip Hop CS

Hip Hop CS

https://www.instagram.com/p/Bih5c8cAO41/
So proud of my daughter's first shaker card!

Quick card using birthday freebie from Lawn Fawn

Color practice with Copic markers using stamps by Lawn Fawn

Stamps by Mama Elephant

Homemade buttons for the school carnival. My daughters drew almost all the graphics after being inspired by what they learned from a book

I made this Rae Dunn-inspired card in under 10 minutes. The bear stamp is by My Favorite Things and I colored into a panda!